Carnival Night-Sonic the Hedgehog 3
Carnival Night Zone
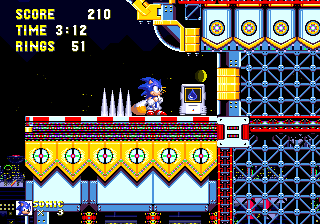
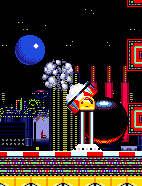
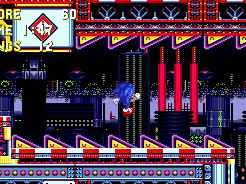
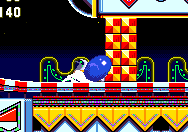
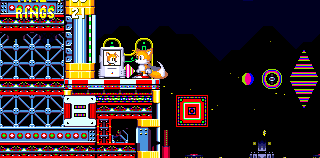
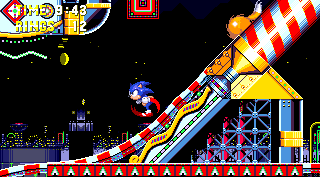
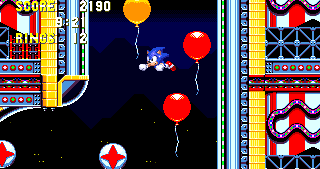
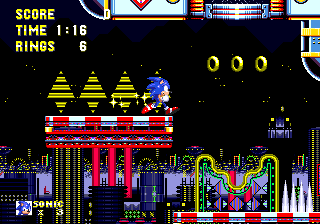
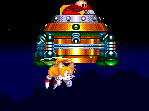
A carnival has inexplicably appeared on the island! Quite how or why isn't clear, but it happily provides Sonic 3 with its obligatory night-time "bouncy stage", complete with many of the hallmarks of its predecessors, such as irritating bumpers, although level structure tends to be more speedy and straightforward than the large pinball rooms of similar levels would allow. With a slightly creepy vibe, the very long and large Carnival Night Zone also boasts balloons, circus cannons, huge spinning wheels and what must be one of the most notoriously baffling objects ever conceived in Sonic history: the rotating drum block. Most are a dangerous crushing hazard, but what to do with the ones that just sit there and bob up and down a bit? Answers inside..

Game: Sonic the Hedgehog 3

Stage Number: 4

Level Division: 2 Acts.

Boss: End of Act 1. End of Act 2 (Sonic/Tails only).

Playable Characters: Sonic & Tails, Sonic, Tails. Knuckles (Sonic 3 & Knuckles only).

Difficulty Rating: 4

Music: Variations of similar music for each act. An acquired taste. It's basically an odd, rather freaky remix of "Entrance of the Gladiators" which, despite its rather deceptively serious name, is the standard carnival/circus theme tune that's used all over the world, everywhere. The first real Sonic BGM that qualifies as being in that "weird" category where it's basically a bunch of well-arranged sound effects. Different track for both acts, but they're very similar.

Typical Length:

Act 1: 3 - 4 minutes (1 - 2 minutes for Knuckles)
Act 2: 5 - 7 minutes (1 - 2 minutes for Knuckles)

Available Items:

Rings Checkpoints 10 Ring Item Box Fire Shield Item Box Water Shield Item Box Lightning Shield Item Box Invincibility Item Box Speed-Up Item Box Extra Life Item Box Eggman Item Box Special Stage Ring
Act 1 312 5 26 2 3 5 3 2 3 0 6
Act 2 261 5 27 2 3 3 4 0 6 0 5

Carnival Night Zone Downloads:

Level Maps: Act 1 map (.png)
Act 2 map (.png)
Art: Official badnik art (.jpg)
Official concept art (.jpg)
Art found in the Japanese instruction manual.
Top Tips
- As is common with all the best "bouncy zones", there are an awful lot of cases where you'll be bouncing back and forth between objects, desperate to get out and progress onward, and this is despite its speedier-than-usual level design. You'll just have to try and cope. If you're on the ground, use the opposing directional buttons to try and maintain control, or to jump your way out of it. The key is to reduce your momentum. The worst ones are where a series of fans are holding you in the air, but groups of bumpers above them are pushing you back. Here, you just need to use good timing and patience.

- One of the biggest concerns in Act 2 is something that, in most levels, you never even really have to think about: time. It's not unusual for a new player to spend almost the entirety of, or perhaps even surpass the standard ten minute time limit, due to the sheer length of the act, and the fact that playing safe against the boss can be very time consuming. If you'd rather not take the penalty of a loss of one of your precious lives, use the guide and map to find shortcuts, and as Sonic, try to take a lightning shield into the boss with you and make use of its double jump. Failing that, careful use of the insta-shield or Tails' helicopter tails should do the trick, with practice. Knuckles, on the other hand, has far far less to worry about this time around.
Fans and bumpers are a particularly troublesome combination.
- A lot of traps can sneak up on you when you least expect it, if you're going too fast. Be particularly on the look out for drum blocks that come up and down through the ceilings of small corridors, ready to crush you. When you arrive at any of these blocks, it might be an idea to take a moment to observe their pattern, in order to avoid getting into a position where they're likely to crush you.
- Always be aware that slotting spikes in very small corridors can easily kill Sonic or Knuckles, because they're too tall to fit underneath. Treat them as small crushers.

- Lots and lots of Special Stage rings in both acts here, and they're all located in small rooms inside the ground, as usual. Look for hidden entrances in the walls.
Ack! Loads of slotting spikes in small corridors make for unpleasant surprises.
Each section of this page allows users to add their own notes to fill in any missing details or supply additional research etc.
View general notes for Carnival Night Zone (11)
#1. Comment posted by Anonymous on Thursday, 8th July 2010, 6:42am (BST)
Why, is that a redundant paragraph I see? I think it is!
#2. Comment posted by LiQuidShade on Thursday, 8th July 2010, 7:50am (BST)
Whoops ^_^;
#3. Comment posted by Justin-s-h on Thursday, 8th July 2010, 5:17pm (BST)
the mystic cave zone also uses the theme of Entrance of the gladiator (if you hear closely)
#4. Comment posted by LiQuidShade on Thursday, 8th July 2010, 7:00pm (BST)
Yeah, but I wouldn't have thought that was intentional, while this clearly is.
#5. Comment posted by SpeedingHedgehog on Thursday, 15th July 2010, 7:44pm (BST)
I think it was used intentionally in Mystic Cave. weather it was intentional or not, it IS used in each.
#6. Comment posted by Anonymous on Sunday, 5th September 2010, 2:27pm (BST)
A section of it is used in Hang Castle as well
#7. Comment posted by Andrew on Sunday, 1st May 2011, 1:50am (BST)
I thought that blaster was sparkle.
#8. Comment posted by Sonic on Saturday, 23rd July 2011, 10:38pm (BST)
Uhhh.... Sorry to burst everyone's bubble, but there IS a way to complete act 2 of this zone with Knuckles.

First, go through Sonic and Tails entire route. Then, after going through the speed gauntlet and dropping down the elevator shaft, jump and grab the side of the shaft and climb up the shaft that you fell down. Once you reach solid ground, jump into the second shaft and climb that. There's no gravity current pulling you up, so you gotta keep climbing. After the long monotonous climb, fight Eggman, open the capsule, and get into the cannon.
#9. Comment posted by Anonymous on Monday, 26th November 2012, 2:55am (GMT)
I'd like to think that after the Death Egg landed on the island, it scattered some debris all over the island, which then was collected by all of Eggman's spare badniks and used to make a carnival death trap for Sonic, all orchestrated by Eggman without actually using hardly any of his precious time. Just one of many theories I thought of.
#10. Comment posted by Anonymous on Thursday, 29th November 2012, 5:51pm (GMT)
Four on the difficulty rating ... I would give it a four for the Sonic route, but I'd give the difficulty rating a two on the Knuckles route, because his route is a lot easier and shorter.
#11. Comment posted by I.M.AM2R on Thursday, 15th February 2018, 10:16pm (GMT)
As Sonic:
Act 1: 2 Sonic Heads
Act 2: Error Sonic Heads; on the Wii, Tails (with Sonic) is the only one who can make the cylinder in closed room thing drop. With Tails, it is 2 Sonic Heads for Act 2. How on Mobius they came up with four is beyond me, with this guide as reference to solve it. And even without the guide, the cylinder thing was easy to figure out. I wasted only 2-5 days on that part.
Hide Notes
Appearance
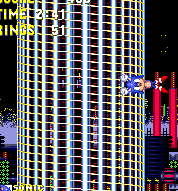
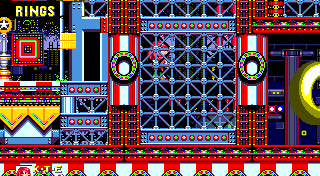
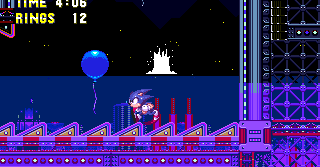
At a time of great strain for Dr. Robotnik, trying to get the Death Egg back up and running and all, it would seem he's still been able to find the time out of his busy schedule to construct a giant carnival theme park on Angel Island for no obvious reason. Think Casino Night, and you're not far off with this, at least as far as the background is concerned. There's a somewhat familiar cityscape scene, though just a tad more abstract, with tall towers and buildings that create a vast, somewhat futuristic carnival night-time environment. At the front, you've got rows of towers and structures, all extremely varied in bright neon colour and shapes. Behind that, in the distance, the structures are harder to make out and mainly consist of a series of lights that fade on and off like a Christmas tree, though some are shaped to vaguely represent various rides and attractions. There are also big, futuristic pod-like buildings and what appears to be a haze of blue evening mist just below. Looming over that are the dark silhouettes of tall, slightly angular mountains, which seem to be adorned with yellow flashing lights, and the top of the screen has a blue glow over the horizon, which rapidly fades into a black starry night sky. This background is, for once in Sonic 3, exactly the same for both acts.
A carnival cacophony of colours greet visitors to the park, with no expense spared in glitzy decorations along the pathways and in the surrounding foreground.
The background is a sprawling, somewhat futuristic cityscape of tall, luminous towers and dazzling lights. A clear blue mist can be seen in the middle distance.
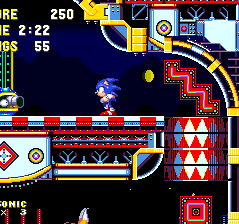
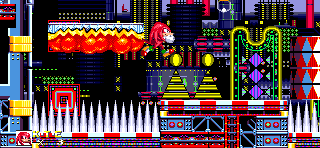
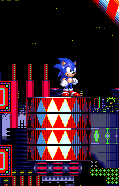
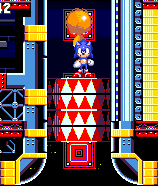
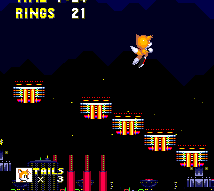
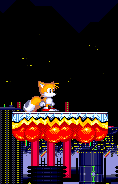
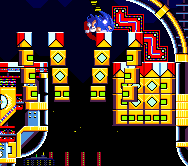
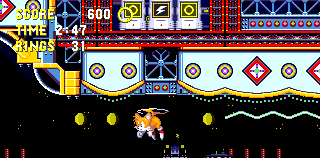
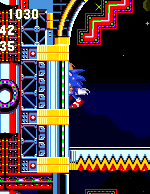
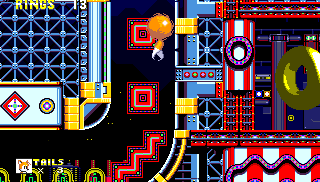
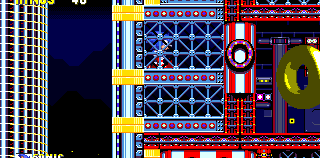
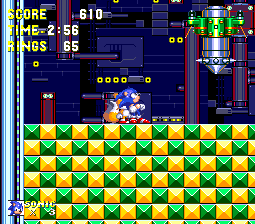
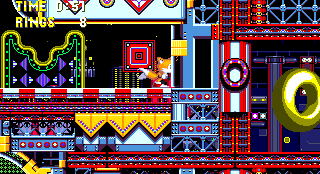
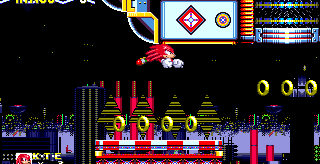
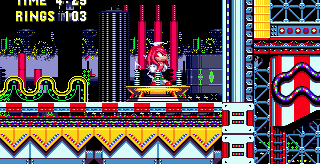
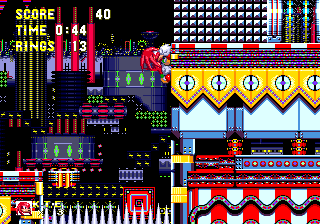
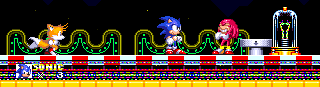
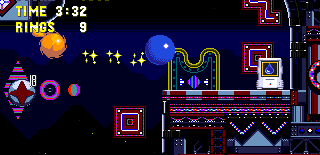
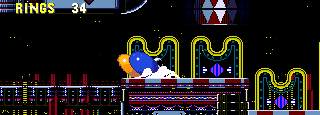
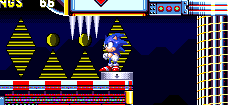
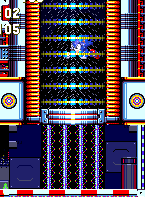
It's the foreground where the carnival theme of the zone really comes into play, full of colour and wacky shapes and styles. The roads are patterned red and white, and so is the majority of the ground, with a lot of temporary structural framework around it, indicating the mobile and dynamic nature of any carnival. To dazzle the eye, there are also zig-zag, triangular, diamond, and wavy patterns, all with alluring flashing lights and bright, cheerful colours. There's plenty to see just by looking at the walls, but as any good "bouncy" zone should have, there's also an abundance of similar stuff behind your character, on the ground and hanging in the air too. You'll see all sorts of abstract shapes of varying patterns and neon colours, most notably, the regular red squares and waving yellow lines that follow the roads. Paths that bob up and down or slope are often lined with rows of yellow speedway flags on either side. It's also worth noting that for a while in Act 2, the lights are switched off, and the zone, naturally, becomes much darker, but you can still see where you're going perfectly well, and the design remains.
The carnival is supported by lots of framework girders and grids, and quite often you can travel behind it into hidden passages.
During Act 2, Knuckles turns the lights out leaving the carnival decidedly less bright and glitzy.
No notes have been posted in response to this section.
Hide Notes
Structure
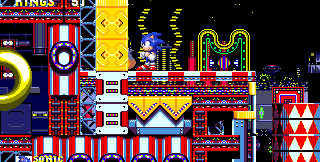
While this is a "bouncy zone" at heart, the level structure isn't quite like the Spring Yard or Casino Night Zones of the past games. While its still based on a very enclosed structural pattern, the large pinball rooms where you would bounce between objects, desperately looking for a way out are no longer present in quite the same way. Narrow corridors and smaller rooms are always a common staple too, and they actually occupy most of this level, based within the confines of the vast carnival construction. This is one of the largest 2D levels in Sonic history, and not only does it occupy a huge space, but the narrow paths wind back and forth and up and down all over it, backtracking over each other, particularly in Act 2, and generally trying to occupy as much area as possible. The corridors tend to meander their way up and down as they lead towards the right, across the map, so this level tends to be one of the longest to complete. These characteristics are typical of both acts, but Act 2 seems to be quite a bit bigger, and longer.
The structure of the whole zone is mostly enclosed, with fairly tight rooms, corridors and shafts. Their inter-weaving nature makes this one of the longest of the classic 2D levels.
In the few larger, open areas, you may find these long diagonal poles that you can run around at speed. You can actually jump off underneath it while running down, for a hidden area or shortcut.
While traditional stages of this type have large open areas filled with bumpers, such areas are generally smaller in this level, though can be just as frustrating at times.
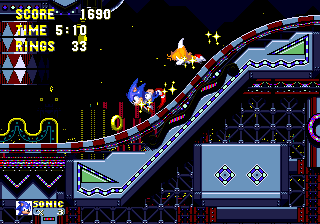
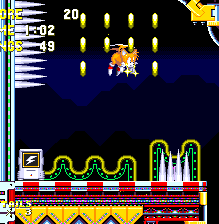
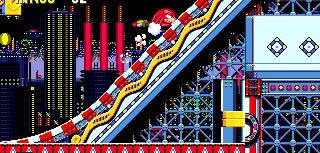
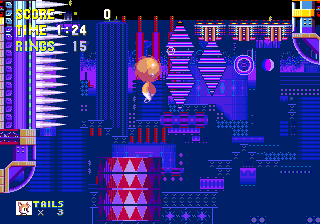
That's not to say the whole stage plods along slowly. Compared to its glitzy cousins, Carnival Night Zone can be quite speedy in occasional large rooms, where diagonal red and white cylindrical slopes are used for rolling right down and blasting along the paths. Your character spins around them as he traverses their length, so you can jump off underneath them for occasional goodies, or perhaps even a shortcut. You'll notice that straight roads and ledges are regularly interrupted by a lot of sudden bumps and curves along the way, though paths tend to be fairly connected horizontally. The platform jumping element usually comes into play when you want to get to a higher ledge above, usually via objects such as balloons, giant wheels and cannons, located in rooms at the end of the corridors. The ground is stable and like most places in Sonic 3, there are no death-drops, but there is a bit of water in Act 2. It doesn't occupy a great deal of your time, and is eventually drained out when you reach a certain point, but the underwater sections can be a bit of a nuisance for some. There are no bubble clusters on the floor, but instead, large air bubbles can be released when you burst the underwater balloons.
As with most stages, many hidden corridors can be found through fake walls, and they're all over the place here. Usefully, much of the ground is partially transparent, so you can still see where you're going.
Knuckles' route is almost completely separate, and surprisingly, much much quicker and easier. The only things to watch out for are slightly nasty spike pits such as these.
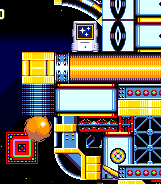
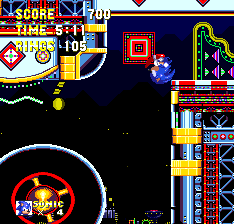
Like Marble Garden Zone, there are quite a few little shortcuts and alternate paths to find along the way, at least in Act 1 and the first part of Act 2. Sonic and Tails have access to the majority of the level, while Knuckles, in S3&K, is mostly confined to his own linear section, cut off from the rest of the stage and hidden along the bottom of the two acts. Of course the upside of this is that, for about the only time, Knuckles has a much easier and quicker ride of this level than Sonic does - he doesn't have any water to deal with, or even an Act 2 boss either! Interestingly though, it is still completely possible to take the full route in Act 2 as Knuckles, however doing so actually prevents you from completing the level, due to a problem explained in Point #2. Sonic and Tails, who've drawn the short straw this time, have no choice but to navigate their way through this labyrinth of carnival chaos, and while the routes aren't quite as complex as in Marble Garden, you can still find one or two significant shortcuts throughout Act 1, which cut through the winding nature of the paths. The main route also splits up into alternate sub-routes towards the end of Act 1. Act 2 follows a similar pattern at the start, but after a while becomes one long, winding path to the end, with few deviations. Along the way, there are loads of hidden rooms in the walls, containing Special Stage rings and other secrets, and because much of the ground is partly transparent, being made of structural girders, you can often spot rings on the hidden paths within, indicating secret corridors.
#1. Comment posted by SonicTailsKnuckles on Tuesday, 19th February 2013, 6:20pm (GMT)
Knuckles has a great time, in my opinion! In Act One, there's a long red and white pole, shortly after the start. Leap down it and land on a ledge with a Clamer. Spindash him then get thirty rings behind a wall. Or, glide from the top of the pole to land in an alcove with a lightning shield and twenty rings. Finally, leap off the pole at the bottom two get twenty rings, an extra life, and find another forty rings above! So yeah, Knuckles has a much shorter level, and tons of rings. CNZ has loads of rings. :)
#2. Comment posted by Anonymous on Thursday, 2nd October 2014, 10:55pm (BST)
if you think this zone has a lot of rings, you should see marble garden!
Hide Notes
Obstacles and Features
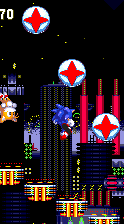
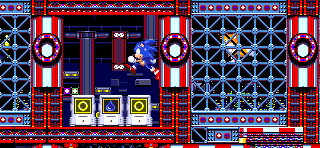
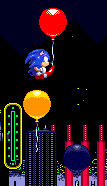
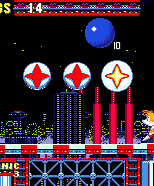
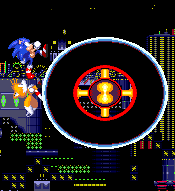
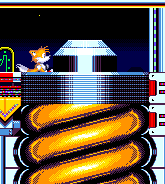
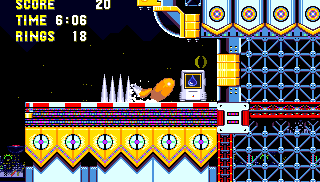
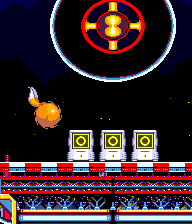
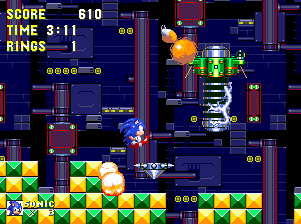
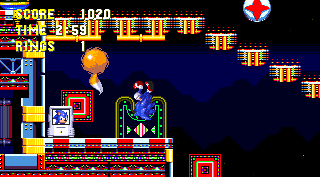
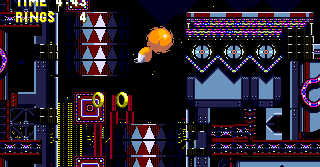
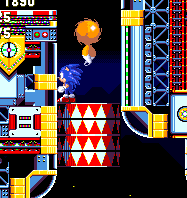
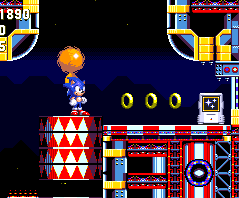
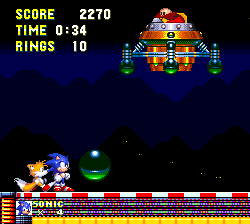
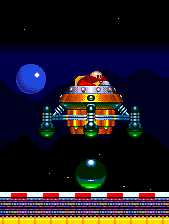
All sorts of small, annoying things to bounce you back and forth, as you would expect, plus larger features that propel you across wide or tall distances. Firstly, you'll notice balloons of varying colours floating in the air. Jump on them and they'll burst, but also send you upwards with a satisfying bit of height, and you can use rows of them to get to a high ledge. If you mess up, you won't have to go too far to make them re-spawn, and if you burst one while underwater, it'll produce a large air bubble for you, which is the only way you can get them during the water sections of Act 2. The bouncy spherical bumpers are back, but with a new design of a red four-point star on a white sphere. They usually come in groups, moving just above the ground or in an open space, and making their living out of trying to get in your way (and very successful at it they are too). There's a variety of precise formations, but most of them involve two or three orbiting around a point in a small area. You can also get groups of them moving around in a circle, stuck together. Like all good bumpers, they award 10 points for each hit, up to ten times per bumper. Circus cannons are another standard feature of Carnival Night, found in open rooms. Hop in at the top and the cannon will begin turning left and right in a semi-circle, at which point, you can press a jump button at any time to blast out of it in the direction its facing, usually directly to a high ledge, or some balloons first.
Balloons burst, but also provide a quick boost upward when jumped on.
Bumpers are a classic staple alive and well. Bounce off them and get 10 points at a time for your trouble. Come in very annoying formations and positions though.
Circus cannons rotate by 180 degrees continuously after you've jumped in. Press a jump button at any point to blast off in the current direction.
These notorious drums/barrels can be used as platforms or crushers. They rotate constantly while you ride on top of them.
Top tip of the century: When you come to the drums that don't move by themselves but bounce down when you land on them, hold down while they move down, and up while they move back up. This will extend their range further each time.
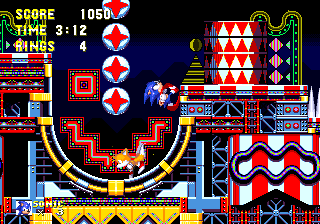
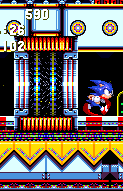
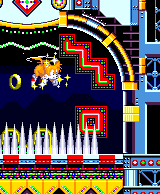
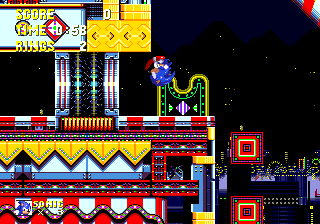
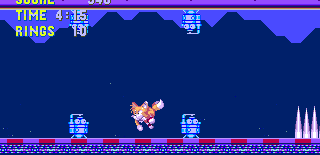
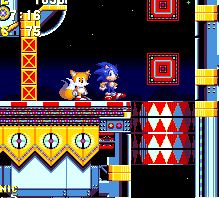
The standard "big moving block" for Carnival Night is an infamous large red and white rotating drum/barrel. Like the thinner ones in Hydrocity, you rotate around on them while standing on top, and they move right and left and up and down over a particular distance, or in a square pattern. Sometimes they're together, sometimes they're on their own, and they may offer themselves as a useful platform, or they may try to crush you into the floor, ceiling or wall. There are also ones that just sit there, only bobbing up and down when you land on them, as they react to your weight. If you're completely new to this level, this next explanation will probably be more useful than any other I can ever give! What most people don't realise until they're told about it, is that you can actually manipulate their movement by pressing the up and down buttons as they move. Land on it so that it bobs down, and at the same time, hold the down button once on. When it springs back up, hold the up button, and switch back to down when it bobs down again. Keep doing this, and you'll be able to gradually force the barrel to move further up and down each time, and this is mandatory in one, inescapable place in Act 2 (see Point #8). The insistence of these early games to provide absolutely no in-game descriptive assistance with particular traps whatsoever has never been more of a hair-pullingly frustrating issue - where's Omochao when you actually need him, eh?
Large black wheels - hop on and run round and round as they spin. Leap off at the right point and with the right speed for a significant boost.
These yellow fans keep your character afloat in the air.
These huge cylinders stretch over vast heights and move down or up as they rotate. Grab on for a ride.
These magnetic gateways propel you in one direction, but prevent access the other. Sometimes used in vast numbers in long corridors.
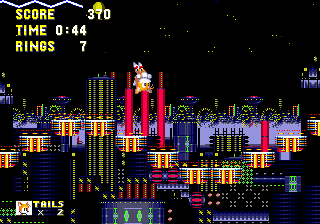
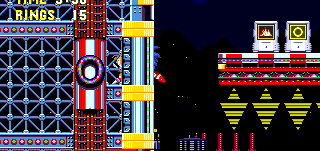
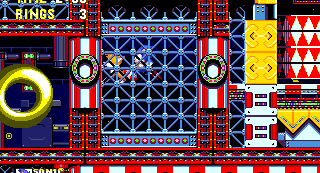
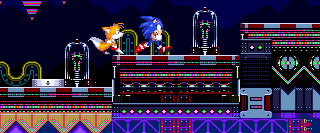
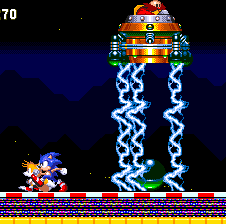
The big black wheels act like larger versions of those found in Scrap Brain Act 2, so you can jump on one and it will take you around until you jump off. Press the down button while onboard to hit a spin and go at super speed, and then jump off at the right point for a massive leap. You usually have to use it to reach a high ledge to the side of it. Some thin paths are made of yellow fans that keep your character floating above. These may be broken up, with a single fan moving back and forth between the gap, so if you want to cross, you may have to try and move along with it, while hovering above. Huge black vertical cylinders normally found in a row are forever turning. Grab on, and you'll swing around with it, going either up or down, depending on the cylinder. You can jump from one to the other to get where you're going. Large magnetic elevator vents in ceilings suck you in when you get close, and propel you quickly and easily up the shaft to a higher area, but it's impossible to go back down it. Speed gateways of a similar technology, found in large numbers within long corridors, can provide a boost one way but deny access, the other.
Magnetic elevator shafts link one lower corridor to another, directly above. They suck you in and float you upwards quickly, but there's no going back down.
Odd platforms that descend the longer you stand on them. Jump continuously to add height.
Classic pinball stage triangular bumpers line floors and ceilings of some corridors. Their angles force you along one direction as they bounce you up and down.
Hop in either side of the top to spin through these coils of yellow tubes..
..If you have an odd number of rings at the time, you'll pop out of the left hand tube, while an even number brings you out of a hatch to the right.
Jump on large yellow blocks in gaps in the floor to smash them out of the way.
Spin Dash to break through walls in corridors.
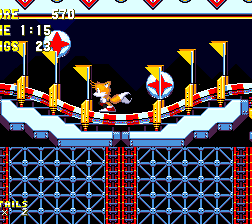
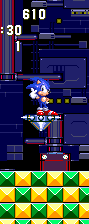
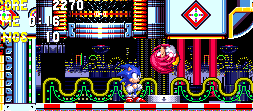
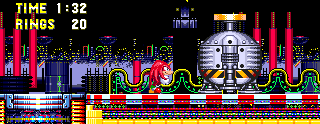
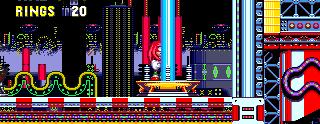
Long white floating platforms with a yellow and red zigzag pattern on the bottom drop downwards when you stand on them, but if you keep jumping instead, the bottom will inflate and take you upwards, bit by bit to the next ledge. Try not to let Tails get on them if he's following you around, as he has an unfortunate tendency to screw the whole thing up by jumping at inappropriate times, or, for some bizarre reason, spin dashing on it. If it drops all the way to the floor, you won't be able to get it back up without leaving the area and letting it reappear above the ground. Winding yellow pipeways compressed together send you out either left or right through tubes leading to hatches at the end, and though you can enter either side of the top of these pipes, this doesn't seem to have a correlation with which side you'll come out on. From what I've found, it would appear to be related to your ring count: If you have an odd number of rings, you'll come out of the left side, and an even count will bring you out along the right side. Each leads to a different route, although not massively separated. In typical pinball zone style, the ceilings and floors in some straight horizontal passages can hold rows of small triangular bumpers that bounce you between them. Once you hit one, you'll be sent only one way along the corridor, fairly quickly. Make sure you're aware that slotting spikes positioned in the ceiling of narrow corridors can kill Sonic or Knuckles instantly, though it may not seem like it. Tails is short enough to survive with only a slight scrape of his fur. Spin dash through breakable walls in corridors, jump on large yellow blocks in the floor to get through them, and doorways can close behind you when inside corridors.
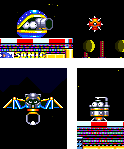
Badniks consist of Clamer, Batbot and Blaster. Clamer is a clam bot that hides in its blue shell, with only a pair of eyes visible, but produces a small cannon that fires a fairly slow moving spikeball horizontally when you step near it. Try jumping on him, and you'll just bounce right off, so hit a spin dash or use Sonic's insta-shield. Not to be confused with relative Batbrain from back in the Marble Zone, Batbots hang motionless in the air, until you pass by. They start to flap around in circular formations, stalking Sonic and co like adoring fans. Except not. Blasters are pretty strange, and dangerous, and groups of them can be found latching onto floors and ceilings in a tall corridor. They switch from floor to ceiling, producing a stream of electricity from point to point, which is always straight and vertical. What you need to be careful of is the couple of sparks that shoot out diagonally from them either side, when they first arrive on the floor or ceiling.
Badniks Clamer, Batbot and Blaster.
#1. Comment posted by Super Volcano on Friday, 22nd October 2010, 11:57pm (BST)
With the balloons, some of them are a similar colour to Sonic. These ones turn golden and start flashing when your Super Sonic. Also, there's one balloon (not sure which) that as long as the lights are off and it's not underwater, appears black and hard to see.
#2. Comment posted by Oobo on Wednesday, 9th February 2011, 7:13pm (GMT)
The batbots are annoying with the huge white cylynders, especially in one huge room on knuckles route in act 1
#3. Comment posted by Andrew on Sunday, 15th May 2011, 12:09am (BST)
The Blasters have another name, Sparkle.
#4. Comment posted by SpinDashMaster [The Sonic Center]] on Monday, 30th April 2012, 2:53pm (BST)
The Anti-Gravity fans can be passed through both from above and below in most cases. To fall through a set, lure a damaging object, such as a bat, to the fans and get hit. This allows you to explore Knuckles' path as Sonic in either act.
#5. Comment posted by angelthehedgehog on Thursday, 22nd August 2013, 2:44am (BST)
I hated those red and white barrels so much that I resorted to using debug mode to go through walls, but then I made the stupid mistake of pressing the debug button while on the barrel, and I got sent to the title screen.
:(
#6. Comment posted by Anonymous on Thursday, 22nd August 2013, 2:45am (BST)
The one time I actually WANT omochao....
#7. Comment posted by Anonymous on Monday, 17th August 2015, 9:58pm (BST)
Yes, debug has a tendency to soft-reset the game under certain conditions. Going into edit mode while "riding" something is probably the most common culprit. Possibly because of some missing data that is normally had by Sonic not had by the sprite editor.
#8. Comment posted by Anonymous on Wednesday, 28th September 2016, 3:40am (BST)
I am fairly certain that the yellow corkscrew tubes have nothing to do with your ring count. If you enter from the left of the large rivet (I call that strange silver thing protruding from the top a rivet, for lack of a better name), you get shot out the right exit. If you enter from the right side of the rivet, you go out the left.
Hide Notes
Typically, springs and bumpers and all manner of other bouncy things throw you back and forth frequently in this level. Try not to fall into traps like these that interrupt your play.
The top of the act features a series of very tall, thin strips of foreground. Hop across the top of them, avoiding obstacles, and it'll help you remain on the upper route toward the end. A lower one can be taken by slipping through the gaps and finding the yellow pipeways at the bottom. Both routes are about equal in length.
Taking the upper route toward the end of the act, past the two huge rotating cylinders, if you drop down through the first gap in the fans that you soon come across, you can find an extra life on a left hand ledge.
This is about the only remaining mystery of this level that I haven't worked out. Just on the other side of that extra life, there's a hidden room in the middle featuring a lightning shield and rings. Problem is, how do you get them? The only possible entrance seems to be from beneath, but Tails can't get through, as the bottom of the item boxes are in the way! Answers please.
#1. Comment posted by afolita on Sunday, 11th July 2010, 2:07pm (BST)
About the mysterious room: I suppose it was originally planned to be accessed through the wall next to that 1-up monitor, but then they decided to remove it. So, they made the wall solid but... they forgot to take away the monitors!

By the way, in Sonic 3 alone, you can knock down the lightning shield by flying underneath (it'll fall below the fans) and enter the room as Tails. Also, in both versions you can hit the shield from below as Sonic using the nearby black wheel and with the help of a lightning jump, but it's very hard.
#2. Comment posted by Oobo on Tuesday, 22nd February 2011, 4:57pm (GMT)
Looking at the map, it seems that you can take the bobbing barrel by the start to go down to knuckles route using sonic and/or tails. Is this possible?
#3. Comment posted by Supurbia on Sunday, 27th February 2011, 4:43pm (GMT)
For that room...go to the top of the ramp, with the orange balloon on the right. Use that balloon to get onto the platform with the red spring on the left. Don't take that spring, instead, take the navy balloon on the right. Jump on the platform to the right, and walk inside the hidden room.
#4. Comment posted by Anonymous on Saturday, 15th September 2012, 2:31pm (BST)
To answer Oobo's question over a year late, no, the barrel doesn't go low enough. So... why is it there at all? Well, when playing as Sonic and Tails, Tails jumped on it and started it moving, so it may have been there as a hint to players of how to get past the barrel in Act 2!
#5. Comment posted by Anonymous on Thursday, 2nd October 2014, 11:02pm (BST)
i think its just there to tease you and waste your 10 minutes!
Hide Notes
Special Stage Rings
Special Stage Rings
Hop off of the underside of the first long red and white pole to get the hidden ring to the left of it.
The first big ring is situated underneath the first long red and white diagonal pole you come to on the main route. As you wind your way down, jump off underneath and follow the curved left hand wall upwards.
Take Tails' Point #1 shortcut and you'll find it through the corridor along the top of the act.
Sonic can get at it from the other side, just before the first main route checkpoint.
This one has two possible entrances, first found by taking Tails' shortcut in Point #1. Past the line of spikes, head into a hidden corridor on the right. The ring sits in the middle of the corridor that exits out to the main route on the far right. For Sonic alone, this also serves as an entrance. It's to the left of a long descending platform and big wheel, just before the first main route checkpoint.
Take Sonic's shortcut off of Point #1 and this one will be hard to miss.
Take Sonic's shortcut in Point #1 and you can't miss it. It's in the right hand wall just as you spin dash up the curve to rejoin the main route. A checkpoint is just above.
Follow the main route, as high as you can go off of the first checkpoint, to two huge rotating cylinders. The ring is in the wall to the right of the second.
There's a couple of very tall spinning black cylinders along the way from the first main route checkpoint at the top of the act. They're preceded by a series of tall, thin platforms within the level structure. A ring is hidden in the right hand wall of these, below some wall spikes. Watch out that you don't slip into the winding yellow tubes to the lower left of this area, or you'll miss your chance.
From the previous huge black cylinders, go as far low as you can along the following paths to find three more cylinders. Look for a high right hand ledge with a bubble shield and explore the corridor behind it.
From the previous big ring, drop down and carry on and now go as far to the bottom as you can go as you continue, until you'll eventually find another large room with three huge cylinders. Look for a ledge over on the right where a corridor is hidden behind a bubble shield.
A Knuckles only big ring! Look for it just behind the last checkpoint.
This last one is just for Knuckles. It appears at the end of his exclusive route on the bottom of the act. The ring's hidden corridor is located to the right of the final checkpoint, just to the upper right of a pair of spike pits.
No notes have been posted in response to this section.
Hide Notes
Point #1
With Tails, you can take advantage of a great shortcut soon after the start, avoiding a fairly substantial, weaving chunk of level. Off the start, proceed right to the second set of floating balloons, hanging above a slope and a stretch of fans. Use these to get to a platform holding three ten ring item boxes below a large spinning wheel, and use the momentum you get from riding the spinning wheel to leap to a high ledge on the left. Here, a series of moving red and white drums invite you upwards. Sonic alone can still follow up to this point, but will get stuck at the top, where a partially spiked vertical corridor requires the use of Tails' flying abilities. Worth it if you can get up there though, as it leads into a long internal corridor that conceals a Special Stage ring, and then carries on further into a far later portion of the act, at the top of the map.
Aim for this platform, abundant with ring items, for sneaky shortcuts. As Tails, take the upper left route, above the wheel. As Sonic alone, carry on along the highest route that you can go to the right.
Tails needs to carefully fly past the spikes as he goes higher. The route at the top leads through a hidden corridor, past a Special Stage ring and eventually to a later point in the act.
As Sonic, continuing right from the the thirty rings and wheel, when you take the first elevator vent to another wheel, a shortcut can be found by taking the wheel to a higher right hand ledge. Another Special Stage ring and checkpoint follows.
Fortunately, clever Sonic players can find a sneaky consolation route that's potentially just as fast. From the platform with item boxes, go right across all the various platforms and stay as high as you can. Go up the elevator shaft at the end, where you'll find another black spinning wheel. Perform a similar trick with it and leap off to a high right hand ledge where a quick spin dash up a slope (which also hides a big ring) will get you back in the game.
#1. Comment posted by niconoe on Sunday, 9th March 2014, 3:03pm (GMT)
If you want to take thoses rings in that shortcut with Sonic, you can jump on the left side of the wheel (1st picture) and continue to get high. You can use the 1st spring to get on the highest drum and get 8 more rings but it's not over...
Jump on the drum in front of you and when it's as high as he can, don't try to jump on the other drum above, just jump against the wall at right and run onto this wall. Because of the incurved part, you'll be able to reach that higher drum and so, get the magnetic shield and the 12 finals rings :)
Hide Notes
Boss
Act 1 Boss
This one can be quite hard, and it's certainly unusual. You're in an internal elevator room and as you drop in, you land on a slab of green and yellow blocks that extends across the width of the shaft, and it descends down it. A long silver contraption with a green section to hold electrical antenna will appear above you. This is a unique boss, so pay close attention. It has a pointed section at the bottom with spikes spinning around it, and this will detach from the main machine and start bouncing around the screen, deflecting off of the yellow and green blocks, and destroying them four at a time as it hits them, which leaves big gaping holes in your only stable ground. Naturally you want to keep as much of this intact as possible, as if you fall all the way through the gaps, it'll be to your death. You can also stand on the flat top of the bouncing spike so that it carries you around, however. What you really want to do though is hit the main machine, which moves back and forth above the blocks, though watch out for the electricity it emits at regular intervals. When you hit it, the machine will stop moving and open itself up, vulnerable for attack. However, the catch is that you don't attack it yourself, the spinning top will cause damage to it when it makes contact with the open area, while it's bouncing around the place. Once it makes a hit from its own appendage, the machine will close back up and start moving again, and you'll have to hit it again to open it. Unconventionally, this boss only takes a mere four hits to defeat, but your biggest danger is instant deaths, either by falling to the bottom of the screen, if the spinner breaks enough blocks, or by getting squished underneath the spinner as it's coming down, which is surprisingly common.
An odd boss, this one. The machine releases a spinning spiky top that proceeds to destroy the checkered floor, piece by piece, as it bounces dangerously around the descending elevator shaft.
To destroy it, you need to hit the main machine to open it up (being careful of the electricity generated), and wait for the spinner to hit the exposed innards. Repeat for required four hits.
One option is to stand on top of the spinner itself.
My advice is to be as quick as you possibly can. At the start, stand to the left of the machine, because the spinner is going to fall to the right. As soon as it comes loose, hit the machine to open it up, and the idea is that you try to trap the spinning top in the right hand side of the screen, with the machine in the middle, and you on the unscathed mountain of blocks on the left. In order to do this, you need to stay close enough to the machine that you can jump and open it up again very soon after the sinning top has hit it, in order to limit its movement. If you let the top get out, then there's no telling what could happen. With boss beaten, whatever blocks are left continue their descent to the floor at the bottom of the shaft, where they disappear behind it, although you can get crushed under them if you're standing on the floor, and below one of the blocks, as it comes down.
#1. Comment posted by afolita on Sunday, 11th July 2010, 2:30pm (BST)
You should point out the lightning shield's usefulness here.
#2. Comment posted by Jim on Sunday, 1st August 2010, 11:44pm (BST)
Another useful way of beating this boss is, if controlled correctly, you can bounce off its top indefinitely whilst the spinning top does its thing. The upside to this technique is that because you cannot see the floor, the spinning top does no damage to it, so once it's defeated, you have a pretty intact floor.
#3. Comment posted by Craig on Thursday, 26th August 2010, 10:19pm (BST)
It's always fun to crouch after killing the boss until the camera scrolls down; usually the signpost will fall through the floor.
#4. Comment posted by 3ach on Saturday, 16th October 2010, 7:45pm (BST)
If you fight this boss with Knuckles, and die, you wont be able to fight it with rings, if you hit the last checkpoint.
#5. Comment posted by Oobo on Wednesday, 9th February 2011, 8:07pm (GMT)
To 3ach;
You can fight him with rings, but you need to backtrack a bit by climbing un the wall, and the batbots and spikes often catch you with no rings. In other words, you can, but its a little difficult.
#6. Comment posted by 3ach on Monday, 28th February 2011, 7:50am (GMT)
@ Oobo

Yeah, getting rings by climbing up the wall is possible, but I personally think it's more trouble then what it's worth. I'd rather take my chances ringless against the boss, or better yet, reset the game (since CNZ act 1 isn't very long at all for Knux).
#7. Comment posted by Anonymous on Sunday, 18th November 2012, 4:29pm (GMT)
For some reason, this miniboss is unusually tough for Knuckles despite there being no gameplay or difficulty changes to it. I think perhaps this is due to knuckles being less maneuverable than Sonic or Tails.
#8. Comment posted by Tim333 on Monday, 22nd July 2013, 8:05am (BST)
I encountered a bizarre glitch here (real original Sonic 3 cart, real hardware) recently. I was playing Sonic alone, and after beating this miniboss I heard the death noise. Then, to my astonishment, Tails appeared. He flew down and did the victory pose with Sonic. He then followed me around Act 2 until I lost him, after which he didn't reappear. I have no idea how to reproduce this.
#9. Comment posted by Anonymous on Saturday, 5th October 2013, 1:23pm (BST)
Tim333 that happened to me once also on the genesis! bizarre...
#10. Comment posted by Anonymous on Wednesday, 28th September 2016, 3:55am (BST)
ORKAL documented the Tails glitch in his video series. Check it out here: https://youtu.be/pKSXchTQDsY?t=49s
Hide Notes
Just after the third Special Stage ring and before Point #4, there's a long descending sprawl of fans with a gap at the end. Drop down the gap and backtrack a bit underneath to find this life nestled away in the corner.
There's a pair of long diagonal red and white poles that cross each other in a large open room toward the end of the act. You come down the one starting from the top left and go up and around in the level to come back down the other a bit later. You can take advantage of this and skip this unnecessary chunk by leaping off of the underside of the first pole and then head left underneath it. A spring brings you straight up to rejoin the end of the second pole.
No notes have been posted in response to this section.
Hide Notes
Special Stage Rings
Special Stage Rings
Jump off to a ledge that's just below the ledge that leads to a big shortcut in Point #2, as you wind down the first long red and white pole.
This first big ring of Act 2 is situated in a corridor from a ledge that's just below the ledge to jump off to for the shortcut in Point #2. Leap off of the long red and white pole at the right time. You can also get it by carrying on along the main route until you get to the first cannon. Hop in the wall on the left, and find a room with 20 rings and a bubble shield. Open them up and drop through the floor to this ring.
When you get to this platform with a fire shield and ten rings, find a secret corridor in the left wall.
Progress on the main route to come to a pair of rotating drums that you need to perform the "hold down, hold up" trick on (see Features and Obstacles for more) to go higher in a tall room, where there's a platform with a fire shield and ten rings. A big ring room is situated in the wall to the left of this platform.
Carefully pass a crushing drum to get to this ring near the top of the act.
Mildly dangerous one, this. Keep going up after the last big ring, through a long elevator shaft toward the top of the act. A hidden big ring can be found through the left hand wall, however, a crushing drum is moving up and down just in front of the entrance, so you need to make your way through carefully to avoid being crushed into the floor!
Shortly before the final checkpoint, you need to carefully use these balloons, leading up toward a high ceiling, and find the ring's corridor on the top right hand side.
The final one for Sonic and Tails doesn't come along until much later, shortly before the final checkpoint in fact. An elevator shaft will bring you to a room with balloons leading upwards to a high ceiling. Follow them up one by one and aim for a hidden corridor on the top right hand side to find this rather nicely hidden ring. This area is situated such that it's difficult to leave and come back again to make the balloons re-spawn, so if you mess it up, you may not get another chance.
Knuckles has to get this last ring by being slightly sneaky and going up a slope made for Sonic, immediately after the first burst of speed-ups, after the last checkpoint. Jump as soon as you come out of them.
Carry on up the slope, through another set of speed-ups and then underneath the second slope to drop into the ring's room. Carefully land to the side to prevent falling right through.
This Knuckles-only big ring is a very tricky one that's not easy to work out. Just before the end, Sonic and Knuckles' routes briefly meet as they both take the same long corridor with speed boosts. While Sonic goes up a slope, Knuckles goes right under it and then drops below for more. In order to get the ring, you have to go up Sonic's slope. This is best done by jumping as soon as you come out of that first set of speed-ups, and glide up the slope to remain on it. As you carry on along another set of speed-ups, you should go straight under a second slope, which drops into the room holding the big ring. You might want to drop to the side to try and land on stable ground just next to the ring, because while it's still appearing, you can fall right through it. The route below is Knuckles' regular route.
No notes have been posted in response to this section.
Hide Notes
Point #2
There is a fairly good shortcut right at the start of Act 2, for Sonic and Tails only (see next paragraph for Knuckles' issue with this route) but it requires split second timing for Sonic to get to. After running through the first corridor, you'll be sent out with incredible speed into the first main room, and land on one of the long red and white diagonal poles. At the start of it, on the right is a platform and a ledge. To get to them, you need to jump as soon as you come out of the corridor, ideally before even landing on the pole. It takes practice, though Tails' flight will certainly prove useful. On the ceiling above these platforms is an elevator shaft that'll bring you right up to a hidden room above. Spin dash up the left curve and knock through some blocks on the floor in the bottom right corner of this room to progress.
For a shortcut right off the start of Act 2, jump high as soon as you leave the long corridor of magnetic gateways. This takes some practice.
..You should be able to jump straight past the long red and white pole, over to these ledges, where an elevator vent carries you straight upwards, and on your way.
Interestingly, since Knuckles also begins this act in the same way, before taking his own designated (and very quick) route shortly afterwards, he can also gain fairly easy access to this area, thanks to his gliding and wall climbing abilities. However, this is something of an oversight by the level designers, it would seem, and taking this route with Knuckles will NOT allow you to complete the level. It actually puts him on Sonic and Tails' full route, which he is not supposed to have access to. There's no water in the usual water sections, and the lights will stay on the whole way through (when you get to Point #4, the button to turn them off is missing, and you can just walk right through that area). Everything is fine until you get to the end, and you arrive in his final room, with the teleporter that takes him to Icecap Zone. However, the animal capsule, for some reason, is not there so you can't complete the level, and the teleporter doesn't work! Knuckles is trapped there forever! Try it on a rainy day when you have nothing better to do.
Curiously, Knuckles can also take this route. Even easier than Sonic can in fact, because of his gliding ability. Thing is, this is an oversight. It puts Knuckles on Sonic's much longer route, and there's a problem..
..When Knuckles gets to the end of the act (Point #9), having taken the full route, he'll come into his final room from the upper route, but the animal capsule has disappeared and the transporter doesn't work! You're stuck!
#1. Comment posted by Smiley225 on Thursday, 8th July 2010, 11:01am (BST)
But with Knuckles you can also climb up the elevator which doesn't work at the end of the level and which takes Sonic and Tails to Robotnik. This way, you can defeat Robotnik and complete the level on Sonic's route. However, in Ice Cap Act1 you'll still begin the level at Knuckles' start.
#2. Comment posted by Monty Eggman on Friday, 3rd September 2010, 10:09pm (BST)
I have actually tried that. I can officially say that this trick does work, and it can be much more rewarding.
#3. Comment posted by Anonymous on Saturday, 29th December 2012, 4:23pm (GMT)
If you climb up the shaft, the boss fight is exactly the same, only that it's EggRobo and not Robotnik.
#4. Comment posted by theblackferret on Monday, 25th November 2013, 11:46am (GMT)
You can join Sonic's route right at the start by accessing the vacuum tube at the top right off the barber's pole that goes down left to right, thogh it's usually worth getting to the first ring room off it first time, then spin-dash back up the pole and on to the vacuum tube.

At the end, if you can slam your brakes on just before the drop into Knux's usual finish spot, you can climb up just the one tube to the boss. It also helps to go Hyper/super once you are up there, let him drop the marble, stand right over it, and bash him as the electric storm abates, and he comes to retrieve his marble-you can usually get 4 hits in each time, so two drops,two storms & he's history!!
Hide Notes
Point #3
Not far along, and Sonic and Tails will find that the carnival has been slightly flooded. Progress into this heavily spiked room, and to look at it, it's hard to know where you're supposed to go. Jump on top of the moving block that's sliding back and forth above the ground, and then just make a jump upwards, in the middle of the room. There are fans on the surface of the water above that'll pick you up when you jump near, and you'll find the first checkpoint nearby.
When first making your way into the purple water, you can get out of this spiked room simply by jumping high from the top of the moving drum just above the ground. Fans will catch you.
Things are a bit different for Knuckles. There's no water, first of all, and some minor object placement tweaks mean there's no way of getting on Sonic's route from here. Instead, climb the right hand wall and destroy the block at the top to find the start of your incredibly quick route for the act.
This is where Knuckles takes his own route, because there's no block available for him to jump on. Instead, you'll find a barrier in the corridor on the right wall, which only he can break. There's a fan moving back and forth along the spikes next to you, but this tends to just drop you onto the spikes if you go too near it, so jump up nice and high and glide over it to the wall on the right, and then climb up to this barrier, which will break when you touch it.
#1. Comment posted by Anonymous on Saturday, 29th December 2012, 4:26pm (GMT)
As Sonic and/or Tails, if you smuggle yourself into Knuckles' route in debug mode, pretty much all of it is covered with water.
Hide Notes
Point #4
Knuckles pops up again, finding the mere thought of flicking that switch to turn off the lights to the whole place incredibly amusing.
A darker filter is applied to the act for a while afterwards, but you can still see where you're going pretty clearly.
About halfway through Act 2, Sonic and Tails encounter Knuckles again, conspicuous in his absence from the previous zone, he's determined to make up for it here. Apparently, he's not too miffed by the fact that Eggman has probably destroyed fields, forests and ruins to construct this pointless fun fare, because he's sporting his characteristic smirk, so you know he's about to do something dastardly. He hits another of his magic switches that puts the whole zone in a blackout and turns off all the bright neon lights in an instant. It doesn't make much difference to you though, as you can still see where you're going, it's just that the scenery changes and becomes much less colourful for a while. In Point #7, you'll come to a switch that puts the lights back on again.
#1. Comment posted by Super Volcano on Saturday, 23rd October 2010, 12:06am (BST)
That switch actually controls the water. In a certain hack of S3&K, Ring Grab 2 takes you through this level, and the cutscene has been removed. If you don't turn out the lights, the water level will stay where it is once it's gone back down, so that entire section is dry. With lights!
Hide Notes
Point #5
Before the following, partially submerged segment, you might like a bubble shield over on a ledge on the right of where it begins. Sonic can sneakily bounce from the orbiting bumpers nearby to get there.
At the start of the segment, pass carefully across various spike traps, a crusher and a series of these annoying Blaster badniks on a corridor heading left.
Right after the blackout, you'll have to complete a short water section, through winding corridors that lead downwards. Quite a few traps and annoying bouncy bits through here, but fortunately the water level drops after a short while. If you want a water bubble shield, you can find one over on a right ledge, before you break through the floor to go into the water, at the start. Sonic can use the nearby bumper spheres to bounce his way up there. As soon as you get into the large room with a few idle balloons floating around, the water level begins to drop all the way down, although you now have to fight your way out of a relentless bouncing battle between a pair of springs and a corridor of triangular bumpers that insist on throwing you between each other. This can be very frustrating. After that, be very careful when trying to get past a pair of rotating blocks in a narrow shaft. Land on the second one, and when it's all the way to the right, jump up high so that when you fall, it should have moved out of your way to the left, and hopefully you won't get crushed into the wall by the top one when you do it.
Once you've started bouncing around in this large section of triangular bumpers. You can get air bubbles by popping balloons, but as the water level begins to fall, you may not need them. Springs at the end here will make life a bit difficult for you though.
In a shaft shortly after, there are a couple of tricky crushers, moving horizontally in opposing directions. Carefully jump from the bottom one, up into the open space beside the other and try and fall through the gap once the lower one has moved.
#1. Comment posted by Krometh on Monday, 4th June 2012, 4:04pm (BST)
Here's a possible oversight about the corridor of triangular bumpers around where the water level drops. As Tails, do NOT fly or swim in this area. If you hit a bumper while flying, you may get repeatedly bounced in the same area, unable to get out until time runs out (or resetting the game). This is due to balloons and bumpers having a greater effect on Tails while he's flying.

(If you're swimming and the water level drops below Tails, he will begin flying, putting himself at great risk of hitting the bumpers and getting stuck.)

Well, at least this is what happened to me on my Tails playthrough :).
#2. Comment posted by theblackferret on Monday, 25th November 2013, 11:48am (GMT)
It's great fun joining Sonic's route as Knuckles & playing this bit in particular-no darkness & no water!! You don't have to flick a switch, either!!
Hide Notes
Point #6
Here's an extremely unusual sight, TWO extra lives together! Chances are you won't even notice them, as they sit at the end of a corridor heading left, after you've escaped the previous water segment. They're just on the other side of an elevator vent on the ceiling, which fans below will automatically send you up to without even hinting at their presence. So how do you actually get to them? There's no hidden corridor coming from the other side, it's simply a matter of travelling so fast over the fans that the elevator shaft just isn't quick enough to pick you up. All you need to do is charge up a very powerful spin dash from the right hand ledge. For best effect, tap the jump button constantly over the course of about two or three seconds, and you should just about be able to do it. You need to be pretty ferocious with it though!
There are two super secret extra lives here, beyond the automatic pull of a magnetic elevator vent, just above fans that raise you up to it..
..It's pretty tricky, but the only way of getting them is to charge up the most powerful spin dash of your life from the right hand ledge before the fans. Tap the jump button madly for a couple of seconds. It's possible to produce one that's too quick for the vent to pick you up.
#1. Comment posted by maza17 on Friday, 3rd December 2010, 12:39pm (GMT)
http://www.youtube.com/watch?v=1bJQy7KwVLY

This my video showing the 1-ups of CNZ, including this ones. Actually, I showed to LiquidShade well before he made this guide...
#2. Comment posted by Anonymous on Friday, 30th November 2012, 1:47pm (GMT)
I got the 2 1-ups and the invincibility, but it took a lot of tries!
Hide Notes
Point #7
A button to turn the lights back on follows soon. Spin dash under the spikes to continue.
The rest of the stage is mostly all one very long route, so you'll eventually get to the top of a series of rotating black cylinders, and find a button on the ledge on the left. Ceiling spikes next to it prevent you from getting past without pressing the button and when you do - hey presto, the lights come back on! You'll need to spin dash to get underneath the spikes, and on your way. A checkpoint follows.
No notes have been posted in response to this section.
Hide Notes
Point #8
And we come to this. Unexplained Sonic object design at its most notorious. Frankly, I never had any problems with this, as it was explained to me when I first approached it, but I know a lot of people spent countless hours of their childhood staring blankly at this small room, wondering what in the name of all that is holy they were supposed to do. And it seems to still happen with new players these days as well, so if you're in this boat, dry your eyes and listen up. This small room is completely unavoidable for Sonic and Tails, and the doorway seals behind you as you enter. There's a high ceiling and a rotating drum sitting stationary within a small gap on the right of the floor. As described in the objects list above, this is the kind of block that bounces a little when you throw your weight on it. The trick then, once you've got it going, is to hold the down button when it goes down, and then switch to the up button when it's on its way back up, to make the block bounce up and down more fiercely, and go higher and lower with each bounce. Eventually it goes down so low that it'll delve into the area below, allowing you to jump off, and continue your quest. At last!
This closed off room is the first time you're forced to interact with the bouncing variety of rotating drums. If you don't know how to use them, this'll be a hair-pulling moment for you..
..The trick is to jump on it, forcing it down, and hold the down button while on it. When bounces back up, hold the up button..
..With each bounce, the drum goes further up and down, until eventually it goes far enough for you to jump off to the next room below. Now you can sleep soundly.
#1. Comment posted by AvRhCo on Tuesday, 27th July 2010, 8:52am (BST)
Does anybody know to it that if you use the cylinder to bob up too high, you'll crush yourself into the ceiling. I've always had a slight scare about that, and if it is true, I'd rather not learn the hard way.
#2. Comment posted by LiQuidShade on Wednesday, 28th July 2010, 9:00pm (BST)
I always wondered that too, though never bothered to find out until now. Turns out, there's no danger of it! There's ample room up there at its highest point. It goes low enough to almost touch the one below it, and the maximum height is, I would guess, the same sort of distance above. Nice to finally know for sure!
#3. Comment posted by Craig on Thursday, 26th August 2010, 10:54pm (BST)
I had the same problem playing it for the first time five years ago. The worst thing about it is that jumping on it with the right timing makes it bob up and down further too, so I assumed that's what I had to do and didn't even try the up/down buttons. Worth the pain to get to the glorious Icecap though.
#4. Comment posted by CroRomano85 on Sunday, 17th October 2010, 11:06pm (BST)
Dear oh dear! It weren't hours, it were weeks of my childhood I lost, until I figured out how to pass this crappy room! But apart from it, it's one of the greatest stages ever developed!
#5. Comment posted by Oobo on Tuesday, 22nd February 2011, 4:45pm (GMT)
Thank god for sonic zone 0! I could never pass this stage untill now! Can't wait 'till the guides for sonic and knuckles, i'm stuck on sandopolis zone.
#6. Comment posted by Andrew on Sunday, 1st May 2011, 1:53am (BST)
I had trouble my first time doing this thing. I just gave up and let my time run out. But now it's nothing to me.
#7. Comment posted by Xxaqz on Wednesday, 11th May 2011, 2:33pm (BST)
Ha! it was no trouble at all! hasn't anybody ever explored the controller to see what would happened?

The first time I encountered this I jumped on it, I noticed it didn't work I tried all the combinations to find it, but moving up and down was when I found it!
#8. Comment posted by Tim on Saturday, 29th December 2012, 7:55pm (GMT)
I was stuck for over a month. I was so convinced that jumping with the right timing would get you through. In fact, I think with the help of a second player I might have managed this once, but it could just be my fevered memory playing tricks on me.
#9. Comment posted by Anonymous on Tuesday, 1st January 2013, 3:06pm (GMT)
Bob down on another barrel just below to get an extra life, then go through the wall on the left to get a lightning shield.
#10. Comment posted by Anonymous on Saturday, 5th October 2013, 1:26pm (BST)
Ah the dreaded barrel... I remember calling the sega hotline back in the day for that one...
#11. Comment posted by Anonymous on Monday, 10th November 2014, 5:50pm (GMT)
Ah, the barrel. I know a lot of players have had difficulty with the damn thing. But, if I were making the game, I would have left it in, because, I feel like the barrel is part of the game.
Hide Notes
Point #9
As Sonic and/or Tails, after you're sent through a long series of speed-up doorways through long corridors, you'll fall down through an elevator vent, and at the bottom, you'll find Knuckles standing there with another button. He promptly presses it, chuckles and runs off, after which your character steps backwards and allows the pair of vents to take them all the way up to the boss arena.
Knuckles sends Sonic toward the boss by switching on the elevator he just fell through.
Curiously, Knuckles has no boss in the act. He comes up to this room from underneath where he conveniently finds an unguarded animal capsule with which he can get off, scot free!
To get to the next zone, find a teleporter just next to the capsule, which sends Knuckles to Icecap.
The briefness of Knuckles' Act 2 in comparison to Sonic and Tails' may well astound you, as will the fact that he has no boss. At all. At the end of a separate string of speed-up doorways, Knuckles gets brought up to this same room, on the other side of the button. It has an animal capsule in it, all ready for him to open, and that's it. No strings attached. You'll then find a small teleporter device that'll conveniently warp you to the next level (unless you accidentally found yourself on Sonic and Tails' route, in which case, due to a design oversight, it won't work - see Point #2). Quite why this whole stage is such a cakewalk for Knuckles, compared to the rest of his game, is anyone's guess.
#1. Comment posted by Tim333 on Thursday, 30th June 2011, 7:41am (BST)
I've gotten to Knuckles's exit as Sonic, but to be honest I can't remember how I did it. Some sort of glitch was probably at work.
#2. Comment posted by Tim333 on Monday, 22nd July 2013, 8:01am (BST)
Oh, and Knuckles can climb the vent tubes to fight Sonic's boss. It works!
#3. Comment posted by Anonymous on Wednesday, 28th September 2016, 4:00am (BST)
And if Flying Battery had been the next zone in the lineup (as was originally intended before they split the game in two), Knuckles would have even completely skipped over an entire zone in his campaign!
Hide Notes
Boss
Act 2 Boss
You'll find yourself near the top of the level, in a wide and open arena. Eggman will appear from the upper right in a large, electrical machine surrounded by generators and green orbs. He has a large green orb at the bottom which he'll try to drop on you, but it's an easily avoided attack. If you're near the side of the arena, jump over the orb once it's landed and run to the other side, to have the best chance of surviving the next attack. In general, just keep your distance at this point. Eggman will hover over the orb, and both it and the smaller ones on his craft will begin flashing. Soon, a massive electrical field appears between the two as the smaller orbs start to spin around, and this creates a magnetic pull across the ground, similar to the whirlwind effect in the Hydrocity boss. Keep jumping to avoid the pull until it stops. Eggman's craft will descend in order for him to pick the orb back up and repeat the attack, and that's your best chance. Leap up at the right moment, over the arms of the generator and hit him on the head. To play it safe, repeat this for all eight hits, but this can take a looong time, which is something you may run out of given the length of Act 2. Playing as Sonic, I'd recommend living in the fast lane, and use your insta-shield to hit the gold bits of the actual craft from underneath, and avoid touching the green orbs. If you've got the ring magnet shield, you can also use the double jump to strategically leap up and attack the doctor from the top.
Eggman has a simple but fairly long winded attack pattern. Floating high in the air, he drops a green orb vaguely in your direction and then hovers over it..
..Turning the electricity on, the field that surrounds the orb drags Sonic and Tails towards it along the ground. Keep running to avoid!
The safe point to attack would be when he drops down afterwards to recover the orb, low enough for a jump. Sticking to this can make the boss very time consuming however.
Speed things up by carefully using the insta-shield, between the smaller orbs.
Tails alone can try his tail attack by hovering carefully underneath.
When you're all done and dusted with that, run along to the right and leap into the cannon at the end. After a couple of turns, the cannon will automatically fire you to the top right of the screen, rather than allowing you to do it yourself. The cannon would appear to be exceptionally powerful, as you're going high up into the snow-capped mountains, where your next challenge awaits...
#1. Comment posted by Anonymous on Sunday, 8th January 2012, 7:56pm (GMT)
Strangely, Sega put essentially the same boss twice in the same game. Hydrocity and Carnival Night have pretty much the same boss (albeit without little bombs this act).
#2. Comment posted by Anonymous on Sunday, 18th November 2012, 4:50pm (GMT)
Similar, though this one is much tougher and far less vulnerable. The instashield trick takes practice because of the orbs. Also, the pulling effect of the magnet is much stronger and you have no choice but to resist it, unlike the simple jumping methodology of Hydrocity. For the most part the "safe" way to fight the boss makes it take a LONG time and the biggest enemy you'll have with this boss is you may only have a minute or two left on the clock, making the safe method questionable.
#3. Comment posted by Teslamania on Wednesday, 14th December 2016, 1:17am (GMT)
Knuckles is so lucky that he gets to SKIP the boss. A harder version would be using a claw to pick up the giant green orb.
#4. Comment posted by Teslamania on Wednesday, 14th December 2016, 1:17am (GMT)
Knuckles is so lucky that he gets to SKIP the boss. A harder version would be using a claw to pick up the giant green orb.
Hide Notes
Miscellaneous Notes
- While it has never been fully explained, storyline-wise, quite why Carnival Night Zone exists on Angel Island, a supposedly undisturbed natural paradise, it's assumed that it has to be the handywork of Dr. Eggman. But why was it created? Did he build it soon after he crash landed on the island, or did he just ship it in after being built somewhere else, as a tourist attraction for the island, or just general amusement for his weird self? Or is it just one long, complicated trap for Sonic, controlled by him? One would assume that Knuckles wouldn't be too happy about such a project taking place for no obvious reason, but I guess these are questions and queries that, like a lot of other things in the Sonic universe, will never be officially satisfied.
- This is not the only level to use "Entrance of the Gladiators", the universal theme tune of the circus as part of its background music. The same part re-appears much later in Shadow the Hedgehog's Circus Park.
#1. Comment posted by wyldcat on Wednesday, 14th July 2010, 3:51pm (BST)
In the STC continuity, the Carnival Night Zone was created and run by three men known as the Marxio Brothers. They were employed by Dr.Robotnik to create death-trap rides in an attempt to kill off Knuckles. Knuckles was on his way to tear the zone down when he bumped into the brothers who offered him a partnership deal. However, although Knuckles was nearly squashed, pummelled and torn in two, he enjoyed the rides so much he let the brothers and their Zone stay.
Another reason why Robotnik may have built Carnival Night Zone;
Remember Casino Night Zone? He made lots of money out of that place via rigged machines. Maybe he was looking to make money out of Emerald Hill folk on the Floating Island, or at least draw them out of hiding.
Just a few possible reasons why the Zone was built.
#2. Comment posted by Sonicfan32 on Saturday, 7th August 2010, 7:14pm (BST)
wyldcat might be right. but in casino night zone, i usually get the money, not robotnik.
#3. Comment posted by Monty Eggman on Tuesday, 31st August 2010, 9:22pm (BST)
My theory:

It's a carnival on the outside, but judging by the interior, mechanical-looking areas of the Zone, it's really a cleverly-disguised base.
#4. Comment posted by Dan on Thursday, 30th September 2010, 11:04pm (BST)
The theme tune appears in Mystic Cave first.
#5. Comment posted by Anonymous on Thursday, 12th April 2012, 6:29pm (BST)
Dan are you stupid. The theme tune to Mystic Cave is nothing like Entrance of the Gladiator's. Get some skill in listening to music before you open your mouth.
#6. Comment posted by Sonic10158 on Tuesday, 5th June 2012, 7:51am (BST)
Maybe this the place where the Echidnas had fun at, before they all vanished aside from Knuckles?
#7. Comment posted by Anonymous on Sunday, 18th November 2012, 4:56pm (GMT)
I never interpreted this to be Robotnik's handy work. I still don't. I imagine this was about as advanced as the "lost civilization" on Angel Island got.

Largely because all through the game's story Robotnik's had MUCH higher priorities.

The idea this is a base of his is stupid, too. He already has Launch Base (Which is the zone after next, meaning that the Launch Base is already too close to this zone for this being a base of his illogical.) and the Flying Battery. And he's always used an "eternal engine" style of base (Think Scrap Brain and Metropolis.) with zero indication that places like Casino Night or Spring Yard were ever bases of his.

On top of that didn't CHAOTIX already basically establish places like Carnival Night were on Angel Island for a very long time?
#8. Comment posted by angelthehedgehog on Thursday, 22nd August 2013, 2:50am (BST)
#5 Anonymous,go youtube mystic cave zone, then listen very carefuly...

#9. Comment posted by bob on Monday, 27th January 2014, 5:45pm (GMT)
What if this is actually on the surface and interior of the Death-Egg?
It might even explain how #7 said it's too close to launch base. Afterward this zone you get launched to the surrounding mountains and then go back to the base...?
Hide Notes
Each section of this page allows users to add their own notes to fill in any missing details or supply additional research etc.
View general notes for Carnival Night Zone (11)
#1. Comment posted by Anonymous on Thursday, 8th July 2010, 6:42am (BST)
Why, is that a redundant paragraph I see? I think it is!
#2. Comment posted by LiQuidShade on Thursday, 8th July 2010, 7:50am (BST)
Whoops ^_^;
#3. Comment posted by Justin-s-h on Thursday, 8th July 2010, 5:17pm (BST)
the mystic cave zone also uses the theme of Entrance of the gladiator (if you hear closely)
#4. Comment posted by LiQuidShade on Thursday, 8th July 2010, 7:00pm (BST)
Yeah, but I wouldn't have thought that was intentional, while this clearly is.
#5. Comment posted by SpeedingHedgehog on Thursday, 15th July 2010, 7:44pm (BST)
I think it was used intentionally in Mystic Cave. weather it was intentional or not, it IS used in each.
#6. Comment posted by Anonymous on Sunday, 5th September 2010, 2:27pm (BST)
A section of it is used in Hang Castle as well
#7. Comment posted by Andrew on Sunday, 1st May 2011, 1:50am (BST)
I thought that blaster was sparkle.
#8. Comment posted by Sonic on Saturday, 23rd July 2011, 10:38pm (BST)
Uhhh.... Sorry to burst everyone's bubble, but there IS a way to complete act 2 of this zone with Knuckles.

First, go through Sonic and Tails entire route. Then, after going through the speed gauntlet and dropping down the elevator shaft, jump and grab the side of the shaft and climb up the shaft that you fell down. Once you reach solid ground, jump into the second shaft and climb that. There's no gravity current pulling you up, so you gotta keep climbing. After the long monotonous climb, fight Eggman, open the capsule, and get into the cannon.
#9. Comment posted by Anonymous on Monday, 26th November 2012, 2:55am (GMT)
I'd like to think that after the Death Egg landed on the island, it scattered some debris all over the island, which then was collected by all of Eggman's spare badniks and used to make a carnival death trap for Sonic, all orchestrated by Eggman without actually using hardly any of his precious time. Just one of many theories I thought of.
#10. Comment posted by Anonymous on Thursday, 29th November 2012, 5:51pm (GMT)
Four on the difficulty rating ... I would give it a four for the Sonic route, but I'd give the difficulty rating a two on the Knuckles route, because his route is a lot easier and shorter.
#11. Comment posted by I.M.AM2R on Thursday, 15th February 2018, 10:16pm (GMT)
As Sonic:
Act 1: 2 Sonic Heads
Act 2: Error Sonic Heads; on the Wii, Tails (with Sonic) is the only one who can make the cylinder in closed room thing drop. With Tails, it is 2 Sonic Heads for Act 2. How on Mobius they came up with four is beyond me, with this guide as reference to solve it. And even without the guide, the cylinder thing was easy to figure out. I wasted only 2-5 days on that part.
Hide Notes
Last Updated
Content for this page last edited:
8th July 2010

Files last uploaded for this page:
7th July 2010

Recent Notes
General Notes
Posted by I.M.AM2R on 15th February 2018

Act 2 Boss
Posted by Teslamania on 14th December 2016

Act 2 Boss
Posted by Teslamania on 14th December 2016

Point #9
Posted by Anonymous on 28th September 2016

Act 1 Boss
Posted by Anonymous on 28th September 2016

74 notes posted on this page in total