

Level Design Notes
Being the first game, Sonic 1's style of level design would be reflected upon its many sequels to come, so it's just as well that it contains some truly original structural features such as loop-de-loops and extreme slopes and curves, the likes of which had never been seen before in a platform game, and set this one apart from the rest. Basic rules and methods of organising things that have been established here didn't change much throughout the nineties, and even after that, they're never too far away from modern games of the series, even when some of them like to shuffle things around a bit and try new ideas.
The zone/act system of game structuring is established here, whereby the six different, consecutive levels are called zones, differentiated from each other by their background locations and foreground visual features, pathway structures, specific interactive objects and of course, the music that accompanies them. These zones are further sub-divided into acts, which usually all share the same examples of those elements within the zone, but take place on a new layout map, and it's impossible to return to an area of a previous act after having completed it, during a single play through the game. There are three acts per zone here, although it's since become more customary for a zone to feature only two acts in most other games. These ones however are generally a bit shorter, and take place on smaller maps to accommodate for this. At the end of the third act for each zone, a boss battle takes place inside an enclosed space where you will take on Dr Eggman, who floats about in his Egg-mobile and dishes out a certain pattern of attacks that you need to avoid, and hit him with your spin attack jump eight times in order to fully complete the zone. This is the traditional structuring of a Sonic game that has been followed to varying degrees of loyalty by most other games of the series since. It contains very little in the way of story scenes, as most of the game's plot takes place in the form of a prologue that's not really contained anywhere within it. There are a couple of occasions however, such as the ending, where Sonic will be controlled automatically as a short, simple scene of events plays out that involves no dialogue whatsoever. Other than that, it's all action, and all you.
There's a great deal of variety across the six zones, many of which have since become pretty common level types. The nighttime cityscape with crazy looping and spiralling roads suspended in the air, the threatening factory environment, the pinball inspired zone that sends Sonic bouncing between bumpers, the cramped water-filled caverns and of course the hilly, tropical seaside paradise - all of these recurring environments throughout the series have their origins right here. What's also perhaps more evident here than in most other titles is the degree of variety in pace, regarding structural designs. Zones such as Green Hill and Star Light are custom built for speed, and can flow very naturally and really show off what's special about this game, yet Marble and Labyrinth Zones operate in a much slower, more puzzle-based manner such that they could be featured in any other platformer. Many would argue that these levels make the whole game feel slower than most of its successors, but I think it's this kind of variety that's crucial in Sonic level design, and it should never just be all about speed. As is far more common in 2D Sonic games than in 3D, many of the levels give you plenty of multiple routes, shortcuts, detours and hidden areas, so you'll always be able to find bits you've never seen before when replaying over and over again. As a child, I felt that of the four Mega Drive Sonic platformers, Sonic 1 was probably the overall hardest, thanks to the kind of nightmarish challenges you'll encounter in Labyrinth and Scrap Brain Zones. I would probably still agree with that now.
Also definitely worth noting are the visual aspects of the environments you'll encounter, and I feel that there is a certain abstract style to parts of Sonic 1 that set it apart from the others that don't quite match it. Such classic design touches as the chequered ground, folded-card style palm tree leaves and spiky flowers, random words illuminated in neon lights, and the obscure floating bird/fish patterns in the Special Stages have been replicated in certain ways, but there's just something about the way in which they've been used here that gives Sonic 1 a unique aesthetic quality all of its very own.
The six zones are excruciatingly analysed in their own separate pages, which can be accessed by clicking the titles or screenshots of each, from the following list. Details on the final boss and ending sequence are listed at the bottom of this page..
View Notes(0)
Go to..
No notes have been posted in response to this section.
Hide Notes

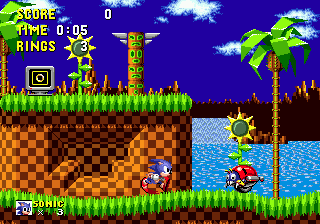
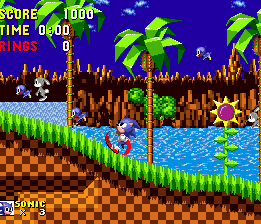
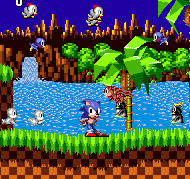
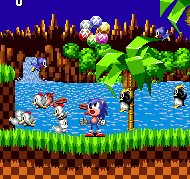
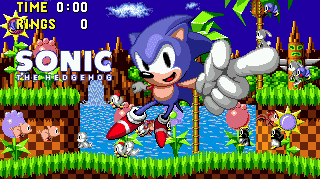
The very first Sonic zone ever made and still probably the most well known after all these years. The palm trees, the orange chequered hillsides, the spiky flowers; The original introductory tropical zone, set in and around a rocky bay. You don't get any more nostalgic than this. It's designed to be fast and simple, with long open stretches, twisting tunnels and loop-de-loops, but watch out for classic badniks and large spike pits.


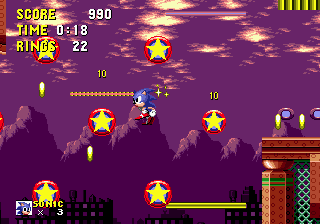
The sky has darkened as Sonic moves into his second ever zone, starting off on the surface of a mountainous/forest region. There are ancient ruins lying around, and huge pits of boiling lava to leap over. Go underground to find a whole massive dungeon maze, made up of narrow corridors and loaded with traps, deadly devices and small puzzles, taking up the majority of this large level. A long, slow-paced stage.

Welcome to the first ever, what is technically known as, pinball or "bouncy" stage. Seemingly set just on the outskirts of a city, this slightly bizarre and loosely casino-themed arena will throw Sonic around, and introduce him to the bumpers and moving blocks that will make this type of level one of the most common in the series. "COPE"!

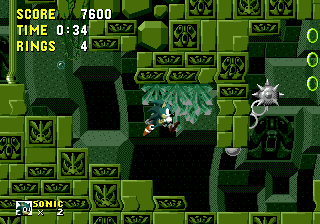
The original "water level" is indeed a tough one, set in the ruins of an underground cavern, mostly submerged in water. Sonic will have to navigate the narrow tunnels and keep an eye on his ever-depleting supply of air while under. There are various puzzles to solve and sticky situations to work your way out of.


The quiet twilight of the city building-tops at night give home to the Star Light Zone, the fastest level in Sonic 1. This unusually peaceful highway suspended in the urban skies is the first of its kind, and though brief, is more fun than it is difficult, as long as you're careful to stay to the upper routes and avoid the many death drops of the lower ones. Notable for having a huge amount of alternate routes and areas to explore, and filled with loop-de-loops, see-saws and fans, this gorgeous zone is absolute classic Sonic.

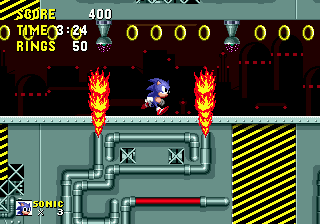
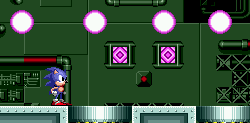
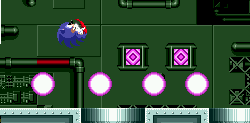
The first central headquaters of Dr. Eggman's empire is one of the toughest Sonic levels in existence. Acts 1 and 2 of this Final Lab are set in and around a giant, grimy industrial factory loaded with traps, while Act 3 is set beneath the base, and more resembles the underground water caverns of the Labyrinth Zone. Unlike the other levels of the game, each act has a different appearance, and structures and obstacles vary too.
Final Zone
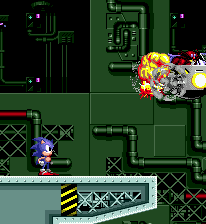
After taking a detour through the water-filled caverns beneath Eggman's base, Sonic pops back up to the factory to be confronted with the bad doc himself for the final showdown of the game! The appearance is the same as Act 2 of Scrap Brain Zone and you begin in an open room with a high ceiling. Walk to the right and past a low ceiling where you'll arrive in the final boss arena. That's right, there are no rings for this one, so if you get hit, you get dead. Fortunately the boss isn't actually as hard is it looks. You'll find yourself in a room with four large mechanical crushers, aligned on opposite sides; two embedded in the ceiling, two in the floor, and leaving a little open space on either edge of the arena. The crushers rest safely in their holes until any two of them are randomly selected to move into the arena, attempting to crush you into the floor or ceiling. They'll start moving slowly at first, so that you have just enough time to decipher which two are moving, and then step out of their way accordingly. You'll notice that Eggman has perhaps unwisely chosen to stand inside one of them, so if you're able to do so, quickly hit him by jumping and making contact with the side of the crusher that he is in. They don't hang around for too long.
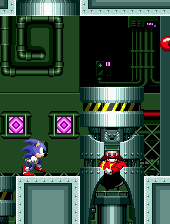
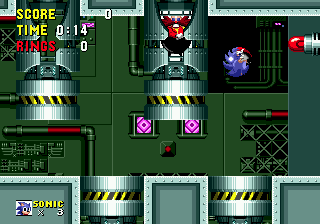
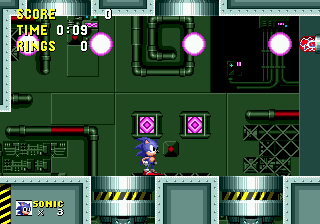
To play it safe, you can leg it to the far right side when the crushers begin to emerge, where you'll be safe from all of them, but there's no guarantee that Eggman will be in the crusher that's closest to you from that point, so this strategy may take a bit longer. You can also stand on the far left side, but there's much less room there. Between crushing sessions, a laser gun, mounted in the top right hand corner, will start buzzing and produce four pink electrical beams, spread out across the top area. The beams are circular and after a moment, will begin moving downwards slowly, slightly in your direction. If you move around trying to dodge them, you'll probably get hit because they cover a wide area. What you'll have to do is get in position before they begin descending. As they're being generated, look for the largest possible gap (these gaps tend to vary in size each time) between two of the four beams and stand directly underneath the center of that gap. Hopefully, when they move down, they should just about miss you, though you may need to jump up when they get quite close, and then maneuver yourself left or right over them, as they continue to descend through the floor. This simple two-pronged pattern will repeat until either you or Eggman goes down, and as usual, he does so after eight hits.
View Notes(5)
Go to..
#1. Comment posted by Anonymous on Wednesday, 11th March 2009, 1:44am (GMT)
#2. Comment posted by Cruizer on Sunday, 25th October 2009, 2:41pm (GMT)
#3. Comment posted by Malpass on Monday, 18th April 2011, 11:37am (BST)
#4. Comment posted by Adam on Friday, 5th August 2011, 10:20am (BST)
#5. Comment posted by Anonymous on Friday, 19th August 2011, 10:35am (BST)
Hide Notes
Ending

On the final blow, both moving crushers will start exploding as they retreat, and the screen pans to the right where Eggman suddenly reappears, dropping from a tube and then running for his life to board his egg-mobile (which, as a one-off, is resting on the ground, on little legs for some reason). Follow him to continue the scene, and as he flies off, you can decide whether Robotnik retreats safely, or goes down in a flaming ball by getting one last, cheap shot in on him, just before you reach the edge of the path. Cut back to the Green Hill Zone where peace has finally been restored, as all of Sonic's little friends leap around happily while he does a victory lap over the hills. Sonic will eventually stop in an area, and if you collected all the six Chaos Emeralds during the game, via the Special Stages, they'll magically appear above him, and then disappear back into the wacky dimension from whence they came, also leaving the Green Hill Zone with extra flowers and taller trees. If you didn't collect them, Sonic will just stand there tapping his foot at you for a moment. Either way though, he'll then leap out at you in a victory pose, accompanied by the game's title, and followed by the credits. Credits don't feature too many names, so they also contain footage of the levels being played, some revealing more hidden bits and techniques you may have missed along the way (although not if you used this superb guide). After the credits we're shown a sprite of Eggman either juggling the remaining Chaos Emeralds or, if you stole them all from his evil grasp, throwing a comical tantrum on top of the word "End".
View Notes(8)
Go to..
#1. Comment posted by Chris on Monday, 4th August 2008, 2:52am (BST)
#2. Comment posted by murphy341 on Tuesday, 17th March 2009, 1:32am (GMT)
#3. Comment posted by Anonymous on Monday, 8th June 2009, 10:39pm (BST)
#4. Comment posted by Cruizer on Sunday, 25th October 2009, 2:42pm (GMT)
#5. Comment posted by Tricky E on Sunday, 23rd May 2010, 2:58pm (BST)
#6. Comment posted by LiQuidShade on Sunday, 23rd May 2010, 4:56pm (BST)
#7. Comment posted by Tricky E on Monday, 24th May 2010, 11:24am (BST)
#8. Comment posted by items on Monday, 30th January 2017, 10:19am (GMT)
Hide Notes
Each section of this page allows users to add their own notes to fill in any missing details or supply additional research etc.
View general notes for Stages and Story (12)
#1. Comment posted by Philip on Monday, 14th February 2011, 6:03am (GMT)
#2. Comment posted by Andrew on Tuesday, 29th March 2011, 6:35am (BST)
#3. Comment posted by Philip on Wednesday, 27th April 2011, 6:24am (BST)
#4. Comment posted by Andrew on Wednesday, 27th April 2011, 6:25am (BST)
#5. Comment posted by Henry on Wednesday, 27th April 2011, 6:26am (BST)
#6. Comment posted by Adam on Friday, 5th August 2011, 10:30am (BST)
#7. Comment posted by hypermario13 on Tuesday, 29th November 2011, 3:46pm (GMT)
#8. Comment posted by noah berton on Tuesday, 29th May 2012, 4:02pm (BST)
#9. Comment posted by Brady Meyers on Sunday, 29th July 2012, 2:30pm (BST)
#10. Comment posted by Anonymous on Monday, 9th December 2013, 1:55pm (GMT)
#11. Comment posted by Anonymous on Thursday, 5th June 2014, 12:01pm (BST)
#12. Comment posted by Anonymous on Sunday, 30th August 2015, 5:35pm (BST)
Hide Notes
- Origin
- Storyline
- Comments
Gameplay - Basics
- Items
- Common Objects
Stages and Story - Level Design Notes
- Green Hill Zone
- Marble Zone
- Spring Yard Zone
- Labyrinth Zone
- Star Light Zone
- Scrap Brain Zone
- Final Zone
- Ending
Other Modes - Special Stage
Miscellaneous - Original Variations
- Ports and Compilation Appearances
- Cheats
Downloads
Last Updated
Content for this page last edited:
12th January 2009
Files last uploaded for this page:
4th January 2009
12th January 2009
Files last uploaded for this page:
4th January 2009
Recent Notes
Ending
Posted by items on 30th January 2017
General Notes
Posted by Anonymous on 30th August 2015
General Notes
Posted by Anonymous on 5th June 2014
General Notes
Posted by Anonymous on 9th December 2013
General Notes
Posted by Brady Meyers on 29th July 2012
25 notes posted on this page in total
Posted by items on 30th January 2017
General Notes
Posted by Anonymous on 30th August 2015
General Notes
Posted by Anonymous on 5th June 2014
General Notes
Posted by Anonymous on 9th December 2013
General Notes
Posted by Brady Meyers on 29th July 2012
25 notes posted on this page in total