


The quiet twilight of the city building-tops at night give home to the Star Light Zone, the fastest level in Sonic 1. This unusually peaceful highway suspended in the urban skies is the first of its kind, and though brief, is more fun than it is difficult, as long as you're careful to stay to the upper routes and avoid the many death drops of the lower ones. Notable for having a huge amount of alternate routes and areas to explore, and filled with loop-de-loops, see-saws and fans, this gorgeous zone is absolute classic Sonic.
Game: Sonic the Hedgehog
Stage Number: 5
Level Division: 3 Acts
Boss: End of Act 3
Playable Characters: Sonic
Difficulty Rating: ![]()
![]()
![]()
![]()
![]()
Music: ..contributed by guest writer Flint
A large fan favourite, this song is actually based on Dreams Come True's
song Kusuriyubi no Kesshin. It's the most chilled out tune on the game,
carried by soft synth sound resembling a xylophone and possibly even softer
percussion keeping a gentle rhythm behind it. The chorus isn't much
different, it just adds a slight "trumpet" track on top of the tune. Cool
and calm, it's simply a piece of gorgeous melodies, well earning its
positive reputation. Same music for all 3 acts.
Typical Length:
Act 1: 1 - 2 minutes
Act 2: 1 minute - 1 minute, 30 seconds
Act 3: 2 - 3 minutes
Available Items:
| Act 1 | 113 | 0 | 11 | 0 | 3 | 0 | 1 |
| Act 2 | 179 | 0 | 6 | 0 | 1 | 0 | 1 |
| Act 3 | 179 | 1 | 9 | 2 | 5 | 0 | 1 |
Star Light Zone Downloads:
| Level Maps: |
Act 1 map (.png) Act 2 map (.png) Act 3 map (.png) |
| Art: |
Official badnik art (.jpg) Unofficial level artwork for Zone: 0 (.jpg) By artist Ricky Earl |
Top Tips
- The only big danger here is falling off the screen to your death, particularly in Act 1 where the gaps appear to be larger. Just ensure that you're not running too fast when you're low down in the level, so that you don't fall off an unexpected ledge at the end, and hop between platforms carefully. Try not to make blind leaps of faith to platforms that you hope will be there, because they won't always be. The see-saws are mostly placed precariously over these gaps too, so keep your controls tight when using them, as it can be easy to fall off. Ideally, stick to the top of the stage.
- The long highways can be even more fun at lightning speed. There aren't many springs or decent propulsion systems to speed you along automatically, so do it yourself. Hit the down button while running, to perform your rolling spin attack when on downward slopes, and you should sail through the following twists and loop-de-loops, at the fastest speed in the game. Pure fun.
- The long highways can be even more fun at lightning speed. There aren't many springs or decent propulsion systems to speed you along automatically, so do it yourself. Hit the down button while running, to perform your rolling spin attack when on downward slopes, and you should sail through the following twists and loop-de-loops, at the fastest speed in the game. Pure fun.
Artwork by Ricky Earl, for Zone: 0.
Each section of this page allows users to add their own notes to fill in any missing details or supply additional research etc.
View general notes for Star Light Zone (12)
#1. Comment posted by Anonymous on Wednesday, 15th September 2010, 11:35pm (BST)
#2. Comment posted by The Great SonicHolio on Wednesday, 6th October 2010, 10:26pm (BST)
#3. Comment posted by yasin smaidy on Monday, 6th December 2010, 10:23pm (GMT)
#4. Comment posted by Anonymous on Wednesday, 22nd December 2010, 11:37am (GMT)
#5. Comment posted by Philip on Monday, 14th February 2011, 6:06am (GMT)
#6. Comment posted by Anonymous on Tuesday, 15th March 2011, 7:15am (GMT)
#7. Comment posted by Anonymous on Friday, 19th August 2011, 7:04am (BST)
#8. Comment posted by Anonymous on Tuesday, 29th May 2012, 3:23pm (BST)
#9. Comment posted by Anonymous on Monday, 18th February 2013, 6:31pm (GMT)
#10. Comment posted by Anonymous on Thursday, 13th June 2013, 7:47am (BST)
#11. Comment posted by Anonymous on Friday, 5th July 2013, 5:18pm (BST)
#12. Comment posted by Anonymous on Wednesday, 20th May 2015, 9:29pm (BST)
Hide Notes

One of the prettiest zones around, and a personal favourite of mine. Its appearance kind of resembles a more calm, yet generally speedier version of Spring Yard. Here, Sonic is up high above the city, running around a highway that may be partially under construction, as most of these styles of city zones seemingly are. In the background, you've got three different layers of city buildings, the two at the back being made visible only by their blue window lights. At the bottom of the level, you'll find closer, brick buildings of varying colours and architecture, and at the top, a beautiful starry night.

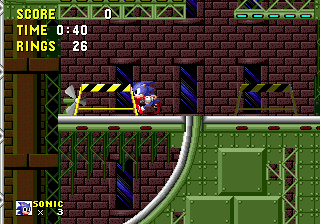
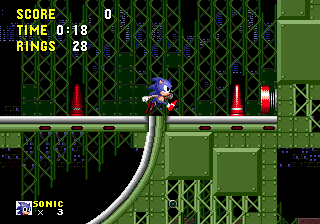
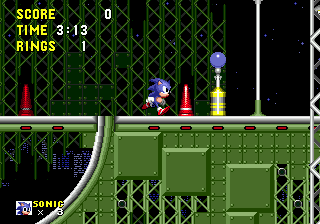
Sonic's immediate surroundings are highly decorated, and the man-made ground and platforms are of an olive green colour made up partly of bolted-down blocks, partly unfinished structural chassis. Subtle flashing lights are added here and there, including red ones that illuminate the grey road surface, lined up just below it. To liven up the environment further, we have more constructional chassis going on, green in areas behind the road, and tall grey girders that appear in front of your view of Sonic regularly, but not enough to become annoying. Add tall street lights on either side of the straight roads, plus yellow and black road block barriers, traffic cones and decorative little potted hedges, and you have yourself the Star Light Zone, the sleeping city.

View Notes(0)
Go to..
No notes have been posted in response to this section.
Hide Notes

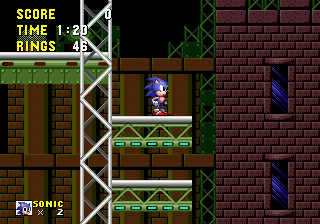
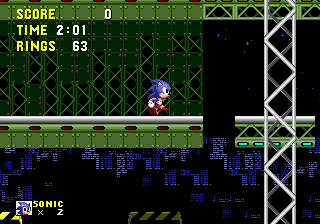
Though this high-speed zone is usually fairly short and sweet, it has possibly the largest amount of alternative routes in the whole series. There are literally half a dozen to a dozen different ways of getting through each act, and it'll be ages before you find all the different areas in the level (I'm still finding unfamiliar bits even today!). There are usually at least three or four paths operating from top to bottom in most areas, but the structure is so open and loose that you can switch between these paths at a number of points, thus creating a whole variety of different possible routes to explore throughout. If you're looking to get through in one piece, you'd be very wise to stick to the upper sections, as the bottom of the level is plagued with large open gaps where you can fall off the bottom of the screen to your instant death, as is the norm in these high up, high-speed levels. There isn't a great deal of solid ground, as the level is filled with thin, winding roads that curve all over the place, creating several loop-de-loops, leading both downwards and across, and some slopes can be incredibly steep. These speedy runways are more often positioned high up in the level, while the bottom half contains a variety of platforms to jump across, making the higher routes the far more safer, stable options. Of course, there are plenty of exceptions where these separate halves drift in towards each other, but that's the general rule of thumb.
With all these multiple routes, it might seem as though it could be fairly easy to get lost, but fortunately, all routes pretty much just lead right. As long as you keep going in that direction, you should find a way to the end of each act. It's all a fairly open structure, but some areas are based on straight pieces of platform aligned vertically to create "floors", often more tightly packed in than the long, speedy roads. Use curved edges to get up to the floor above, and gaps in the floor to drop down lower. This is very much a fun and fast level, with the only main danger being falling off the bottom of the level to your death, and the way in which platforms and objects are laid out down there make it a very dangerous area throughout the stage. It's avoided relatively easily however by simply sticking to the top routes, when given the option. I often like to think of this pleasant kind of stage in the penultimate phases of a game as the "eye of the storm", as it were. A relaxing and easier experience between much harder, more dangerous challenges either side of it.
View Notes(0)
Go to..
No notes have been posted in response to this section.
Hide Notes

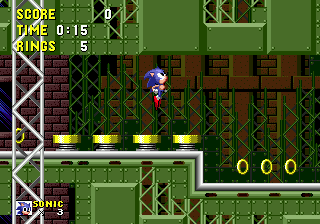
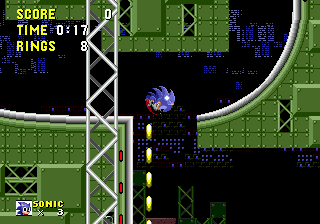
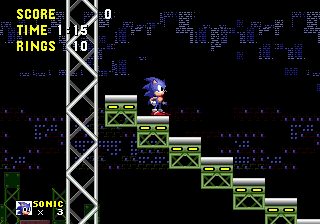
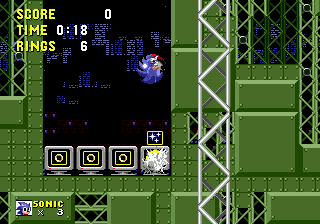
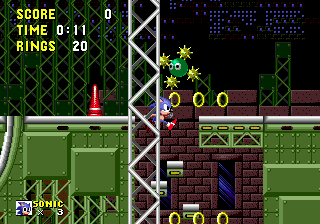
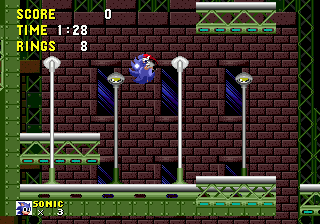
Bridges made up of four blocks will move when Sonic walks on them to form steps, leading down or up. To open up these bridges from below, jump, or spring into them to shake them up a little, and they will then take the form of steps for you to climb up. Other, similar-looking bridges may actually be crumbling ledges in disguise. Land on the large platforms, and they'll give you a short, one-way ride in a certain direction, often to another one right next to it. You'll notice the small fans in this level, which are regularly positioned at the end of ledges, facing Sonic. They'll force him in one direction, either giving him more speed that way, or preventing access to the area behind it. Some fans switch on and off periodically, while others keep going forever, meaning that the path behind them is one-way only.


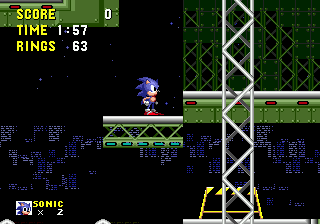
Small platforms tend to circle slowly around each other in groups of four, which is a common formation in levels of later games as well. Land on one and it'll take you round the circuit, and then you can Jump off when you see the next ledge, or onto another group of circling platforms. Be very careful, because they're usually positioned near the bottom, and if you slip, you may well fall to your death. Also beware of the fireballs (yes, fireballs.. in a city) that shoot out from the side of some walls, like in the Marble Zone.
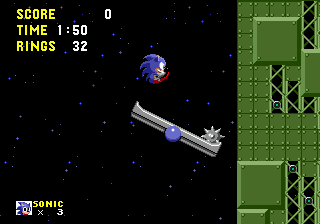

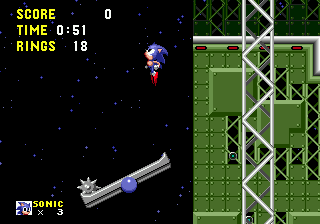
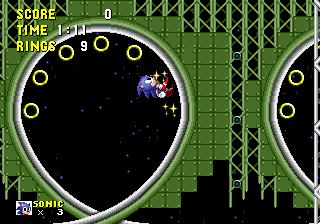
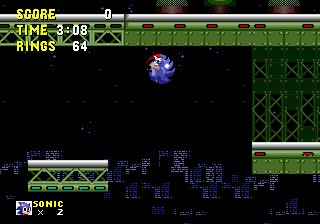
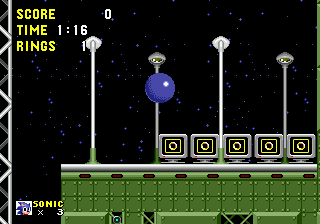
Another notable feature are the see-saws, mostly near the bottom or middle of the level, and can be used to spring your way up to a higher area. They're fixed in the air and hold a spikeball on one side, weighing it down. Land on the other end and your weight will send the spikeball flying upwards, and when it lands, the force will then catapult you upwards too. However, do NOT make the mistake of staying on your side of the see-saw, expecting that ball to maintain its horizontal coordinates. In the series in general, this type of see-saw will always send the ball to the other (your) end instead, so get the hell over to the other side immediately, else you'll be beamed by it. The closer you are to the edge, the higher up you'll go when the spikeball finally lands on the opposite side. If you don't make it, fall back down onto the side you were just on and repeat the process. The added distance of your fall should cause the spikeball to be thrown higher this time, giving you more distance aswell, when it lands.
Long streams of sliding blocks can be difficult to negotiate, unless you know their pattern. It's hard to describe, but they go from one diagonal formation to another, sliding from left to right, and then down, from right to left, and then back up again. Similar to the diagonal formation blocks in Spring Yard, only those were shorter, and only slid from left to right. The safest place is always on the top block, but when that top block moves down, it becomes the bottom block, and the one above it will knock you off when it slides across. Jump up to the top again as quickly as possible, because these are often found in open sections, above death drops.
There are a couple of giant swinging pendulum spikeballs in Act 3, on certain routes, except the spikeball is actually cut in half, so you can use the top as a swinging platform. Don't get caught underneath though, obviously. Also look out for a couple of breakable walls, like in Green Hill, which can be knocked through by rolling along the ground at them with momentum. They're distinguishable from regular solid walls only by the fact that the surface of the path continues on into them. Point #1 illustrates one that you may have missed in Act 1, and there's another in Act 3. Hidden goodies are contained on the other side.
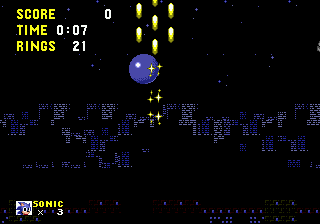
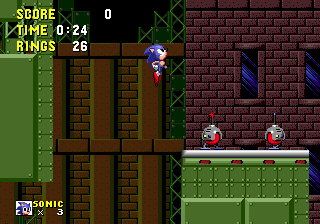
Star Light features two badniks that are very difficult to deal with. One is a green version of Labyrinth's Unidus, which is a sphere surrounded by four spiked balls. This one does not fire the balls at you, they remain surrounding him at all times and he simply moves back and forth rather slowly. Therein lies the problem though because unless you use an invincibility power-up, or attack while Sonic's sprite is flashing after being hit, you will not be able to kill this one. It's probably best to just avoid them, unless you're willing to lose rings, so if you need to get past them, try rolling underneath if there's no room to jump. The other enemy is a walking bomb that lights its own fuse when you get close. You cannot kill these ones yourself either, so you better take cover because when each one explodes, it produces small, red projectiles that fly out across the surrounding area. They are found either on the ground or ceiling and tend to be in groups, creating some dangerous areas.

View Notes(5)
Go to..
#1. Comment posted by Reckoner on Wednesday, 16th July 2008, 8:10am (BST)
#2. Comment posted by Ajavalo on Monday, 28th July 2008, 4:48pm (BST)
#3. Comment posted by CrUiZ3R on Thursday, 21st May 2009, 9:03am (BST)
#4. Comment posted by Evan on Monday, 27th July 2009, 6:33am (BST)
#5. Comment posted by Anonymous on Sunday, 8th January 2012, 2:00pm (GMT)
Hide Notes


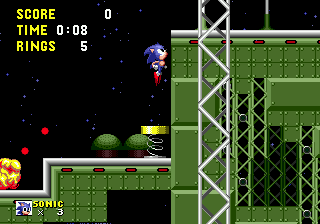
Start of the act. Something about this first spring up a wall that I always think of as being very classic.

The steps will block access to this 1-up as they take you down. If you head down the slope afterwards, then try and make your way back up, the steps should have reverted to their original, bridge state above.
View Notes(0)
Go to..
No notes have been posted in response to this section.
Hide Notes

Something that's very hard to spot without the aid of a map, the very first wall you come to upon walking to the right from the start is a one-off breakable one that you'll be able to knock down by taking a run up and rolling right through. The fact that the floor visibly continues underneath it is a bit of a clue, but I wouldn't blame you if you never really noticed before. It drops you down a tall room where 30 rings and an invincibility lie at the bottom, and use the red springs behind the item boxes to go back up.
View Notes(3)
Go to..
#1. Comment posted by Anonymous on Sunday, 27th January 2013, 7:25am (GMT)
#2. Comment posted by Anonymous on Sunday, 27th January 2013, 7:27am (GMT)
#3. Comment posted by SonicTailsKnuckles on Saturday, 9th February 2013, 5:07pm (GMT)
Hide Notes
If you take the first lower route in Act 1, you'll speed across a long stretch with a loop in it, but reduce your speed when you get to the slope leading upwards at the end, because just beyond that is a group of four circling platforms with immediate death below, so you'll fall right off the edge if you get too carried away.


View Notes(0)
Go to..
No notes have been posted in response to this section.
Hide Notes
Like Spring Yard Act 2, Star Light Act 1 also has two alternate endings. Sort of. There's the basic ending, which all but one of the paths lead to, and there's a secret one directly underneath it. This ending is much more well hidden, but it doesn't actually have its own sign post, and instead, passing underneath the one above seems to trigger off the ending procedure as if you were to touch it. So I guess it's not really a proper alternative ending anyway, but I'm still going to talk about it because its inclusion intrigues me. To get there, take the lowest route you can find through Act 1. After you've hopped across a series of four groups of platforms, head right, and instead of bringing down a series of stairway blocks directly above, carry on below them and jump across an open gap where flame balls are being thrown at you.
Follow this route upwards, via some single transporting platforms, and then some stacked floors with groups of circling platforms on alternating sides. At the top, you'll find a rising platform on the left, which gets you up to a small straight chunk of road. On the right side of this road, you'll find another platform which will lower you back down to the road underneath it, so it kind of goes back and forth in a loop. Instead of taking this downwards, run straight over it, using the road to take a good run up at it, and then take a leap of faith off the platform and jump as far right as you can. You should find the "invisible hidden sign post" on the other side. You can also get up to the main exit by knocking down the stairway blocks in the road directly above the right platform. Not that any of this is useful to anyone that just wants to get through this act in one piece, but it's something worth knowing if you're a fellow completist.
View Notes(2)
Go to..
#1. Comment posted by Super Volcano on Sunday, 30th January 2011, 3:49am (GMT)
#2. Comment posted by Anonymous on Friday, 24th August 2012, 12:45am (BST)
Hide Notes


After the initial speed run, hop up here to follow the winding top route.
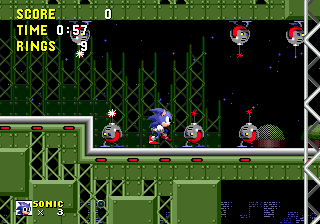
Sections like these filled with bombs are not easy to pass through without a scratch. If you've no rings, your best strategy is stay well away until they've extinguished themselves.
Just under the top route. Always looks like this platform might crush you into the bottom of the road above, but worry not, you're quite safe.
50 Ring jackpot? WIN! Take the highest road you can to the end to get here.
View Notes(2)
Go to..
#1. Comment posted by Azrael on Saturday, 14th June 2008, 5:56am (BST)
#2. Comment posted by Anonymous on Friday, 19th June 2009, 5:56am (BST)
Hide Notes


Act 3 begins with a steep slope. If you roll down it only when the slope suddenly gets more extreme, after the rings, you'll be able to hit the curve at the end and sail up into these rings, where you can land on the see-saws for a small shortcut.
Down the long slope from the start, drop down through this collapsing bridge only if you wish to take the more challenging route, beginning with Point #3.

Move quickly to avoid the gangs of bombs.
The one checkpoint in this zone appears at the end just before the boss, but if you have to use it, you won't be able to get any rings when retrying the boss.
View Notes(0)
Go to..
No notes have been posted in response to this section.
Hide Notes
In the early stages of Act 3, low down, you'll use a see-saw to spring up to this small ledge containing two Bombs. If you try and land between them, and then hop on to the platforms to the right, there's a good chance their explosive projectiles will knock you off, and you'll die at the bottom of the screen. They're best avoided entirely until they've self-terminated, so once you've set them off, just carefully drop back down to the see-saw, and hide in the ledge down there, until you hear them pop.

View Notes(2)
Go to..
#1. Comment posted by Anonymous on Friday, 24th August 2012, 1:24am (BST)
#2. Comment posted by SonicTailsKnuckles on Saturday, 9th February 2013, 5:08pm (GMT)
Hide Notes
This bit's a little weird, and has platforms acting in a way that they don't do elsewhere. You've got two patches on the left and right of this path, near the low route at about the middle of the act, which continually produce a streaming series of regular large, Star Light platforms that rise up very quickly, and then just disappear at the top. Use them to get up to the high ledge on the right.
View Notes(0)
Go to..
No notes have been posted in response to this section.
Hide Notes
Boss
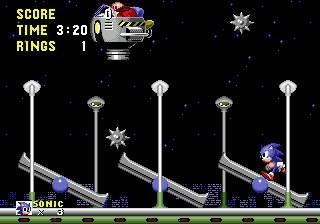
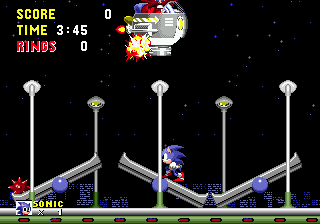
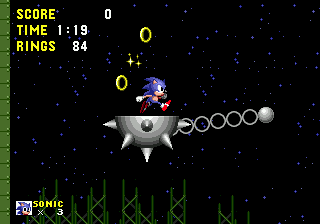
In this arena, you'll find yourself amongst three see-saws. Robotnik appears and starts flying back and forth overhead, occasionally pausing to drop spikeballs on one end of a see-saw. These red flashing spikeballs explode, producing red projectiles, if they're left to sit there long enough. Your aim is to either jump on the opposite end, sending the spikeball up and hopefully collide with the Eggman, or, as with the rest of the level, you can let the spikeball fire you up there instead, to launch your own attack. The spikeballs explode when they either hit Eggman, or land back down on the see-saw, but they won't create any harmful projectiles. Try and take care of every ball he drops, to prevent them exploding harmfully as much as possible, and be careful when you're sent up there to take care of him yourself, because sometimes after hitting him, you can fall into a spikeball that he's just about to drop. Beaten with 8 hits. After the checkpoint (the only one in the whole level!) there are no extra rings, and just before it is a fan pushing you forward, so if you die, you will be unable to re-obtain any rings at all. Bummer.
View Notes(0)
Go to..
No notes have been posted in response to this section.
Hide Notes
Each section of this page allows users to add their own notes to fill in any missing details or supply additional research etc.
View general notes for Star Light Zone (12)
#1. Comment posted by Anonymous on Wednesday, 15th September 2010, 11:35pm (BST)
#2. Comment posted by The Great SonicHolio on Wednesday, 6th October 2010, 10:26pm (BST)
#3. Comment posted by yasin smaidy on Monday, 6th December 2010, 10:23pm (GMT)
#4. Comment posted by Anonymous on Wednesday, 22nd December 2010, 11:37am (GMT)
#5. Comment posted by Philip on Monday, 14th February 2011, 6:06am (GMT)
#6. Comment posted by Anonymous on Tuesday, 15th March 2011, 7:15am (GMT)
#7. Comment posted by Anonymous on Friday, 19th August 2011, 7:04am (BST)
#8. Comment posted by Anonymous on Tuesday, 29th May 2012, 3:23pm (BST)
#9. Comment posted by Anonymous on Monday, 18th February 2013, 6:31pm (GMT)
#10. Comment posted by Anonymous on Thursday, 13th June 2013, 7:47am (BST)
#11. Comment posted by Anonymous on Friday, 5th July 2013, 5:18pm (BST)
#12. Comment posted by Anonymous on Wednesday, 20th May 2015, 9:29pm (BST)
Hide Notes
- Origin
- Storyline
- Comments
Gameplay - Basics
- Items
- Common Objects
Stages and Story - Level Design Notes
- Green Hill Zone
- Marble Zone
- Spring Yard Zone
- Labyrinth Zone
- Star Light Zone
- Scrap Brain Zone
- Final Zone
- Ending
Other Modes - Special Stage
Miscellaneous - Original Variations
- Ports and Compilation Appearances
- Cheats
Downloads
Last Updated
Content for this page last edited:
13th April 2009
Files last uploaded for this page:
7th July 2010
13th April 2009
Files last uploaded for this page:
7th July 2010
Recent Notes
General Notes
Posted by Anonymous on 20th May 2015
General Notes
Posted by Anonymous on 5th July 2013
General Notes
Posted by Anonymous on 13th June 2013
General Notes
Posted by Anonymous on 18th February 2013
Point #4
Posted by SonicTailsKnuckles on 9th February 2013
26 notes posted on this page in total
Posted by Anonymous on 20th May 2015
General Notes
Posted by Anonymous on 5th July 2013
General Notes
Posted by Anonymous on 13th June 2013
General Notes
Posted by Anonymous on 18th February 2013
Point #4
Posted by SonicTailsKnuckles on 9th February 2013
26 notes posted on this page in total